Best Image to 3D Model AI Tools for 3D Printing in 2026
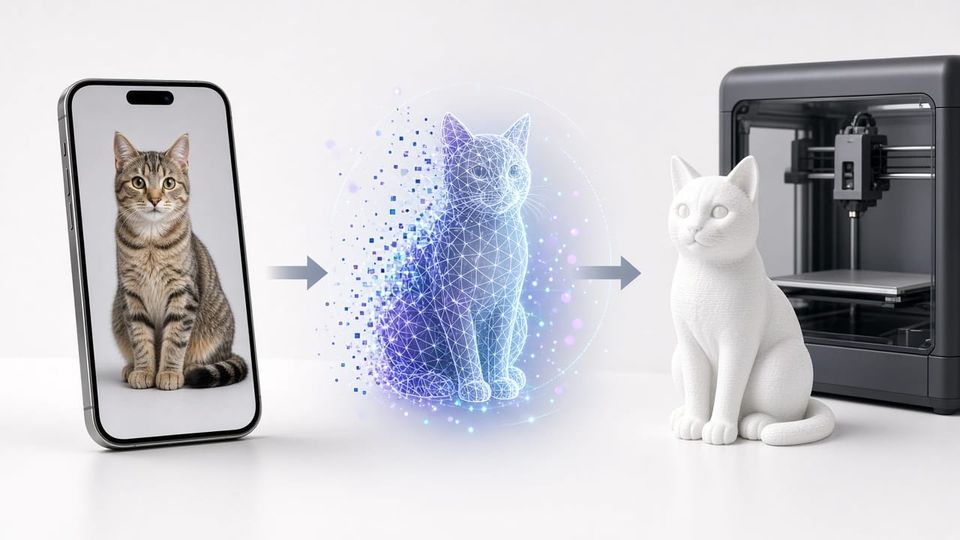
Can AI turn an image into a 3D model? Yes. In 2026, you can upload a single photo to an AI tool and get a 3D model back in 30 seconds to 3 minutes. The technology has improved dramatically in the past year, and several tools now generate meshes clean enough to 3D print without extensive manual cleanup.
But here is the problem with most "best image to 3D AI" articles: they are written for game developers and VFX artists. They rank tools based on texture quality, polygon topology, and rendering pipeline compatibility. If you are a 3D printing beginner who wants to turn a photo of your cat into a physical figurine, those reviews miss the point entirely.
What matters for 3D printing is different. You need watertight meshes that slicers accept without errors. You need STL or 3MF export. You need models with walls thick enough to print, bases flat enough to stick, and geometry simple enough that your slicer does not crash. Multi-color export matters if you own an AMS. And ideally, the tool works directly with your slicer instead of requiring three intermediate steps.
This guide ranks every major image to 3D model AI tool specifically for 3D printing, walks you through the complete workflow from photo to finished print, and covers the problems that trip up beginners when they try to print AI-generated models for the first time.
Quick Pick: Which AI 3D Model Generator Should You Use?
Your Situation | Best Tool | Why |
|---|---|---|
3D printing beginner, want the simplest path | 5 AI engines in one browser, direct Bambu Studio export, print-focused | |
Best standalone image-to-3D tool | Meshy | Strong free tier, printability repair, Blender plugin |
Multi-color 3D printing with AMS | Tripo AI | Multi-color STL export, auto-split for print beds |
Zero budget, no signup required | Hi3D | 100% free, manifold meshes, instant STL download |
Open-source, run locally | TRELLIS-2 | MIT license, 3-second generation, free forever |
Want to try multiple AI engines | 3D AI Studio | Aggregates Meshy, Rodin, Tripo, Hunyuan under one subscription |
Maximum quality, professional use | Rodin AI | 4K PBR textures, enterprise API |
How Does Image to 3D AI Actually Work?
Before comparing tools, it helps to understand what happens when you upload a photo. The process takes about 30 seconds and involves three stages that happen automatically:
Stage 1: The AI analyzes your image. It identifies the subject, estimates its 3D shape, and predicts what the hidden sides (back, bottom, sides not visible in the photo) look like based on patterns learned from millions of 3D objects during training.
Stage 2: It generates a 3D mesh. The AI creates a polygon mesh (a shell made of tiny triangles) that approximates the shape it predicted. Better tools produce cleaner topology with fewer errors.
Stage 3: It applies textures. The AI projects the colors and details from your original image onto the mesh surface, then fills in the parts it had to guess. Some tools output full PBR materials (base color, roughness, metallic, normal maps) for realistic rendering. For 3D printing, you mainly care about the geometry, not the textures, unless you are printing in multi-color.
This is fundamentally different from traditional 3D modeling, where you manually build shapes from scratch. It is also different from 3D scanning (photogrammetry), where you walk around an object and take dozens of photos. AI image-to-3D works from a single image, which makes it fast but means the AI is guessing at everything it cannot see.
The practical implication: simple objects with clear shapes (figurines, vases, toys, product prototypes) convert well. Complex objects with many hidden internal structures, very thin features, or transparent materials often produce unusable results.
The 7 Best Image to 3D Model AI Tools for 3D Printing
1. MakerWorld MakerLab: Best Overall for 3D Printing Beginners
- Website: makerworld.com/en/makerlab
- Price: Free trials per tool, then MakerLab Credits (pay per generation)
- Speed: 2 to 6 minutes depending on engine
- 3D Print Ready: Direct STL/3MF export optimized for Bambu Studio
MakerWorld MakerLab is the best image to 3D model AI tool for people who actually want to print their results. Unlike every other tool on this list, MakerLab was built specifically for the 3D printing workflow, not for game development or VFX.
What makes it unique is that it is a multi-engine platform. Instead of being locked to one AI model, MakerLab gives you access to five different AI engines in one browser interface:
Engine | Speed | Credits | Strengths |
|---|---|---|---|
Tripo 3.1 Ultra | ~3 min | 36 | High detail, clean topology |
Tripo 3.1 Standard | ~2.5 min | 24 | Good balance of speed and quality |
Rodin Gen-2.5 Extreme High | ~6 min | 80 | Maximum photorealistic quality |
Rodin Gen-2.5 Medium | ~3 min | 40 | Good quality at lower cost |
Hunyuan 3D 3.1 | ~3 min | 28 | Strong geometry, clean mesh |
Meshy 6 | ~3 min | 24 | Reliable, well-tested engine |
Hi3D 2.1 Pro | ~20 min | 50 | High precision, longer wait |
Hi3D 2.1 Fast | ~7 min | 24 | Budget-friendly Hi3D option |
The workflow is straightforward: open MakerLab in your browser, upload a photo, pick an AI engine, wait 2 to 6 minutes, inspect the 3D result from all angles, then export as STL or 3MF. The exported file goes directly into Bambu Studio for slicing. No intermediate conversion, no switching between three different websites.
MakerLab also offers specialized print-focused tools that no other AI platform has:
- Image to Keychain: Upload any image and get a printable keychain model with loop attachment
- Make My Statue: Turn a portrait photo into a 3D bust for printing
- 3D Relief: Convert flat images into printable relief panels
- Parametric Model Maker: Customize and download parametric models
The team has stated they are actively working on automatic model splitting (for models larger than your build plate), watertight mesh optimization, and print-specific quality improvements. These are features that matter for printing but that game-focused platforms have no reason to build.
Multi-color printing path: Generate your model on MakerLab using Meshy 6, then use Meshy's Multi-Color Printing feature on meshy.ai to automatically convert textures into AMS-compatible filament zones. Export as 3MF, drag into Bambu Studio, and the AMS handles the color changes automatically.
Limitations: Credits are consumed per generation (not per export), so experimenting with multiple engines adds up. Some engines (Hi3D 2.1 Pro) take up to 20 minutes. The AI-generated models still need print verification. Like all AI tools, the result quality depends heavily on your input photo.
Best for: 3D printing beginners who want to try multiple AI engines without creating accounts everywhere, anyone in the Bambu ecosystem, and users who want a direct photo-to-print pipeline.
2. Meshy: Best Standalone Image-to-3D Tool
- Website: meshy.ai
- Price: Free tier (100 credits/month, ~5 generations), $20 to $60/month paid
- Speed: 30 to 90 seconds
- 3D Print Ready: Direct STL/3MF export, one-click printability repair, multi-color export
Meshy is the most well-known standalone AI 3D model generator, and for good reason. The Meshy-6 engine produces consistently good results across a wide range of subjects, from product photos to concept art to pet pictures. Generation takes under 90 seconds, and the output quality has improved dramatically in 2026.
For 3D printing specifically, Meshy offers two features that stand out. First, printability analysis scans the generated mesh for issues (thin walls, non-manifold edges, holes) and offers one-click repair for 10 credits. This saves you from having to open Meshmixer or Blender to fix problems manually.
Second, the Multi-Color Printing feature is a game-changer for AMS users. It analyzes the model's texture map and automatically assigns filament zones compatible with Bambu Lab's AMS system. The output is a .3MF file where every color region is pre-mapped to a filament slot. You drag it into Bambu Studio, assign your physical filament colors, and print. No manual color painting required.
Meshy also has Blender and Unity plugins for users who want to generate models and drop them directly into their editing software.
Free tier reality: 100 credits per month gives you approximately 5 image-to-3D generations at 20 credits each. Free-tier models are licensed CC BY 4.0 (commercial use allowed with attribution). That is enough to test the tool and print a few models, but not enough for regular use.
Limitations: Locked to one AI engine (Meshy-6). Quality is inconsistent on complex organic shapes with fine details like hair or feathers. No rigging or animation tools (irrelevant for printing). The free tier is restrictive for heavy users.
Best for: Users who want the best single-platform experience with built-in print repair and multi-color export.
3. Tripo AI: Best for Multi-Color 3D Printing
- Website: tripo3d.ai
- Price: Free tier available, $10 to $50/month paid
- Speed: 20 to 60 seconds (fastest in this list)
- 3D Print Ready: Watertight manifold meshes, auto-split for print beds, STL/3MF/OBJ export
Tripo AI is the fastest ai image to 3d model tool available. Standard generation takes 20 to 60 seconds, and the "Ultra" mode (50 credits) produces remarkably detailed meshes suitable for close-up display prints.
The 3D printing features are strong. Tripo generates closed, manifold meshes by default, which means they are watertight and slicer-ready without manual repair in most cases. The auto-split feature is unique: for models larger than your printer's build volume, Tripo automatically divides the model into sections sized for your specific print bed. This is genuinely useful for large format printing projects.
For multi-color printing, Tripo exports color-mapped files that slicers recognize as multi-filament jobs. YouTube creators have demonstrated exporting Tripo models directly into Bambu Studio and printing them with AMS without any intermediate editing steps.
Limitations: Quality is inconsistent on organic shapes with smooth curves. Post-processing tools within the platform are limited. The free tier has restricted credits.
Best for: Users who prioritize speed and want print-ready multi-color models with minimal cleanup.
4. Hi3D: Best Completely Free Option
- Website: hi3d.pro
- Price: 100% free, no signup, no credit card
- Speed: Fast
- 3D Print Ready: Manifold meshes, direct STL export, slicer-safe geometry
Hi3D is the best free image to 3d model ai tool for beginners who want to experiment without spending money or creating an account. You open the website, upload an image, and download the 3D model as STL. No signup, no credit card, no trial that expires.
The generated meshes are manifold (watertight) and can be imported directly into Bambu Studio, OrcaSlicer, PrusaSlicer, or Cura without running a repair pass. The tool bakes a clean albedo texture and provides good baseline topology for static props and decorative prints.
Limitations: Fair use rate limit of 3 generations per hour. No advanced editing or refinement options. No multi-color export. Quality is solid but not at the level of paid tools like Meshy or Rodin.
Best for: Zero-budget experimentation, students, first-time users who want to see what AI-to-3D looks like before committing to a paid tool.
5. TRELLIS-2 by Microsoft: Best Open-Source Option
- Website: Available on GitHub (MIT License)
- Price: Free (requires local GPU)
- Speed: ~3 seconds per model
- 3D Print Ready: GLB/OBJ/PLY export, needs format conversion to STL
TRELLIS-2 is Microsoft's open-source AI 3D model generator with 4 billion parameters. It generates models in approximately 3 seconds, which is absurdly fast. The quality is competitive with paid tools, and the MIT license means you can use the outputs commercially with no restrictions.
The catch: you need to run it on your own hardware. TRELLIS-2 requires a powerful GPU (typically 12GB+ VRAM) and some technical knowledge to set up. There is no cloud version. If you are comfortable with Python, command-line tools, and have a gaming PC or workstation, this is arguably the best value in the entire list because it is unlimited and free.
For 3D printing, you will need to convert the output (GLB or OBJ) to STL using Blender, Meshmixer, or an online converter. The meshes are generally clean but may need a quick printability check.
Limitations: Requires a powerful local GPU. No managed cloud service. The Gaussian Splatting output format is not directly compatible with printing workflows. Setup requires technical skill. No web interface.
Best for: Developers, technically skilled hobbyists, anyone with a powerful GPU who wants unlimited free generation.
6. 3D AI Studio: Best Multi-Purpose Platform
- Website: 3daistudio.com
- Price: $19 to $29/month
- Speed: 30 to 120 seconds
- 3D Print Ready: STL/OBJ/GLB/FBX export, built-in remesh tool
3D AI Studio operates as an aggregator that bundles multiple AI generation engines (Meshy, Rodin, Tripo, Hunyuan, TRELLIS) into a single subscription. Instead of maintaining separate accounts and paying separate subscriptions for each tool, you access all of them through one dashboard.
The built-in pipeline tools (remeshing, rigging, animation, texture generation, LOD creation) go beyond what individual tools offer. For 3D printing, the one-click remesh tool is particularly useful: it converts AI-generated meshes into clean, watertight geometry suitable for slicing.
Limitations: Newer platform with occasional interface changes. Advanced tools consume credits quickly. The experience is more complex than MakerLab for pure printing use cases.
Best for: Power users who work across 3D printing, game development, and rendering, and want access to every AI engine under one roof.
7. Rodin AI: Best Quality for Professionals
- Website: hyper3d.ai
- Price: $10 to $99/month
- Speed: 60 to 180 seconds
- 3D Print Ready: GLB/FBX/OBJ export (may need STL conversion)
Rodin AI, developed by Hyper3D, produces the highest-quality 3D models on this list. The output includes 4K PBR material maps with exceptional surface detail. Multi-view input support means you can provide multiple photos of the same object for more accurate reconstruction.
For 3D printing, the geometry quality is excellent, but the workflow requires an extra step: Rodin exports to GLB, FBX, and OBJ formats. You will need to convert to STL in Blender or Meshmixer before slicing. The high polygon counts also mean you may need to decimate the mesh before your slicer handles it smoothly.
Limitations: Higher pricing tiers are expensive. No native STL export. No print-specific features. Enterprise-focused platform.
Best for: Professional studios, product photographers, and users who need the highest possible detail and are comfortable with post-processing.
Full Comparison: All 7 Image to 3D AI Tools for 3D Printing
Tool | Price | Speed | STL Export | Watertight Mesh | Multi-Color | Free Tier | Best For |
|---|---|---|---|---|---|---|---|
MakerWorld MakerLab | Credits (per generation) | 2-6 min | Direct | Improving (in development) | Via Meshy integration | Free trials per tool | 3D printing beginners |
Meshy | Free / $20-60/mo | 30-90s | Direct | One-click repair | Yes (AMS-ready 3MF) | 100 credits/mo (~5 gens) | Best all-rounder |
Tripo AI | Free / $10-50/mo | 20-60s | Direct | Yes (default) | Yes (color-mapped) | Limited credits | Speed and multi-color |
Hi3D | 100% free | Fast | Direct | Yes (default) | No | Unlimited (3/hour) | Zero-budget testing |
TRELLIS-2 | Free (local GPU) | ~3s | Via conversion | Usually clean | No | Unlimited | Developers with GPUs |
3D AI Studio | $19-29/mo | 30-120s | Direct | Via remesh tool | No | Free credits to start | Multi-engine power users |
Rodin AI | $10-99/mo | 60-180s | Via conversion | Good | No | Limited | Maximum quality |
How to Turn an Image into a 3D Printed Object: Complete Workflow
Most guides on AI image-to-3D stop at "download your model." But for 3D printing, generating the model is only step 2 of a 4-step process. Here is the complete workflow from photo to physical object.
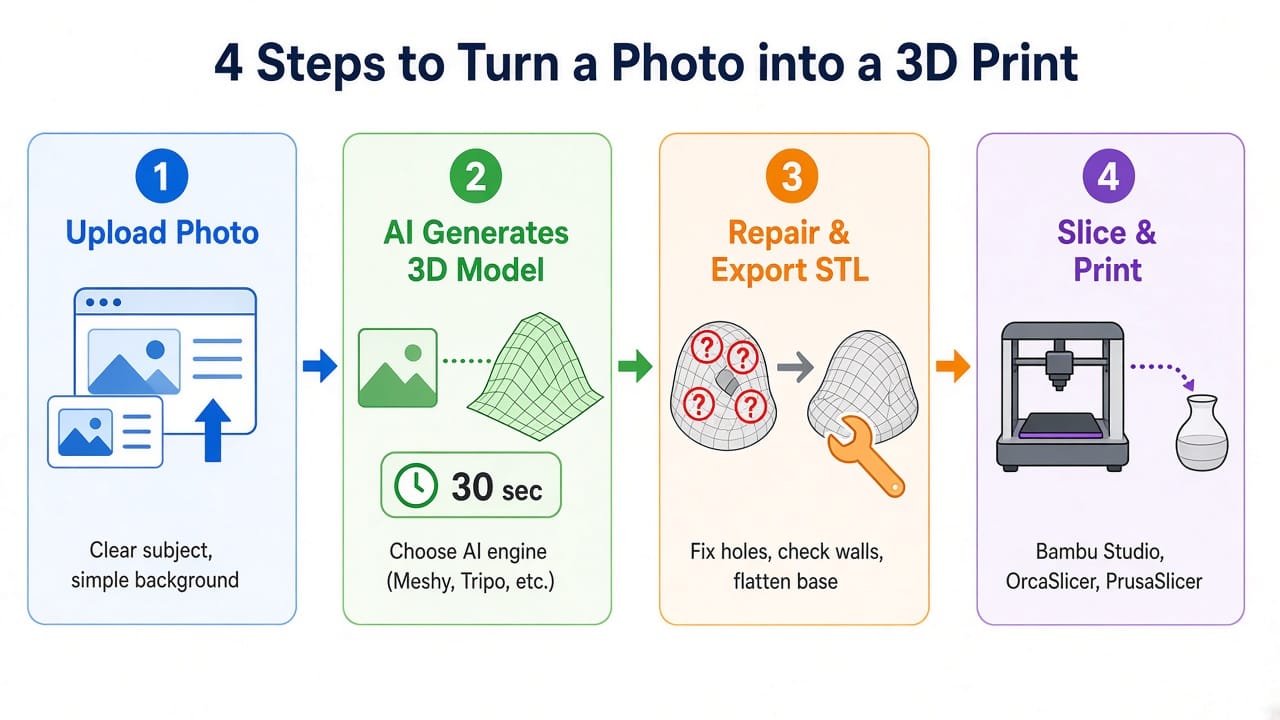
Step 1: Take or Prepare Your Photo
The quality of your input image determines the quality of your output model. AI tools are not magic; they need a clear reference to work from.
What works well:
- Single subject with a clean, simple background (white or solid color is ideal)
- Front-facing view with good, even lighting
- High contrast between the subject and background
- Product photos, pet photos, concept art, clean sketches
- Objects with clear, defined shapes (figurines, toys, furniture, tools)
What produces poor results:
- Multiple overlapping objects in one frame
- Heavy shadows or dramatic lighting that obscure details
- Blurry or low-resolution images
- Very thin or transparent objects (glasses, wire structures)
- Complex scenes with backgrounds that confuse the AI
Pro tip for the best printable results: If you are photographing a real object you want to recreate, place it on a white sheet of paper, use natural diffused light (cloudy day near a window works perfectly), and shoot from slightly above eye level. Remove any distracting elements from the frame. The cleaner your input, the less cleanup you need after generation.
Step 2: Generate the 3D Model
Open your chosen tool (I recommend starting with MakerWorld MakerLab for beginners), upload your photo, and select an AI engine. Generation typically takes 30 seconds to 3 minutes.
Once the model generates, inspect it from all angles before exporting. Rotate the 3D preview to check:
- Does the back look reasonable? (AI guesses the hidden side)
- Are there any obvious holes or missing sections?
- Is the shape roughly proportional to the original photo?
- Is there a flat base suitable for printing?
If the result looks wrong, try a different AI engine. Different engines handle different subjects better. Tripo tends to be strongest on hard-surface objects, Meshy handles organic shapes well, and Rodin produces the highest detail. This is exactly why MakerLab's multi-engine approach is so valuable for beginners: you can try several engines on the same photo without leaving the platform.
Step 3: Repair the Mesh and Export STL
This is the step that most tutorials skip, and it is the main reason AI-generated models fail to print correctly.
AI-generated meshes commonly have these issues:
Problem | What It Means | How to Fix |
|---|---|---|
Non-manifold edges | Edges shared by more than 2 faces, which confuses slicers | Meshmixer: Analysis > Inspector > Auto Repair |
Holes in the mesh | Open gaps in the surface where the model is not sealed | Blender: Select All by Trait > Non Manifold > Fill Holes |
Floating geometry | Small disconnected pieces floating near the model | Meshmixer: Edit > Select disconnected > Delete |
Thin walls (<0.8mm) | Walls too thin for the slicer to create toolpaths | Blender: Solidify modifier with 1.5mm minimum |
No flat base | The model has no stable surface to sit on the print bed | Meshmixer: Edit > Plane Cut to create flat bottom |
Too many polygons (>2M) | Slicer crashes or runs extremely slowly | Meshmixer: Filters > Reduce (target 200k-500k) |
Quick fix workflow with Meshmixer (free):
- Import the STL
- Go to Analysis > Inspector
- Click "Auto Repair All" to fix holes and non-manifold edges
- Go to Edit > Plane Cut if you need a flat base
- Export as STL
Quick fix workflow with Blender (free):
- Import the model
- Enable the 3D Print Toolbox add-on (Edit > Preferences > Add-ons > search "3D Print")
- Press N in the 3D viewport, click the 3D-Print tab
- Click "Check All" to scan for issues
- Use "Make Manifold" and "Recalculate Normals" to fix problems
- Export as STL
For more mesh editing options, see our guide to STL editors.
Meshy users: Use the built-in printability analysis (10 credits) for one-click repair without leaving the platform.
Bambu Studio and OrcaSlicer users: Both slicers include auto-repair functions that fix simple issues on import. For models with minor problems, just importing the STL into your slicer may be enough.
Step 4: Slice and Print
Export your repaired model as STL (universal) or 3MF (preserves color data for multi-color prints). Open it in your slicer. For more on 3D printer file types, see our format guide.
Slicer settings for AI-generated models:
- Orientation: Rotate the model so the flattest surface sits on the build plate. Use your slicer's auto-orient feature if available.
- Supports: Enable supports for overhangs greater than 45 degrees. Tree supports are usually easier to remove from detailed models.
- Wall thickness: Set to 2 to 3 perimeters (1.2 to 2 mm) for printable strength. AI models sometimes have thin sections that need extra walls.
- Infill: 15 to 20% for decorative display models, 30 to 50% for functional parts.
- Layer height: 0.16 to 0.2 mm for a good balance of detail and speed.
- Brim: Add a 5 to 8 mm brim if the model has a small base contact area.
Before printing: Always inspect the sliced preview layer by layer. Look for gaps, unsupported islands, missing detail, and areas where the slicer produced no toolpath. If entire sections are missing in the preview, the mesh still has issues that need repair.
Once printed, AI-generated figurines and decorative models benefit from sanding and painting for a polished final look.
Can ChatGPT Convert an Image to a 3D Model?
This question appears in the People Also Ask box for good reason. ChatGPT is the AI tool everyone knows, so it is natural to wonder if it handles image-to-3D conversion.
The short answer: No. ChatGPT cannot directly turn an image into a 3D model file. It is a text-based AI that generates and analyzes text, code, and images (via DALL-E). It does not produce 3D geometry, meshes, or STL files.
What ChatGPT can do for 3D modeling:
- Generate OpenSCAD code for simple geometric shapes based on text descriptions (you then run the code in OpenSCAD to get an STL)
- Write scripts for Blender's Python API to automate basic modeling tasks
- Generate AI images (via DALL-E) that you can then feed into an image-to-3D tool like Meshy or Tripo
- Help you troubleshoot 3D printing problems by analyzing error descriptions
The practical pipeline: If you want to go from an idea to a 3D print using ChatGPT, the most effective path is: describe what you want to ChatGPT > have it generate an image > upload that image to MakerLab, Meshy, or Tripo > generate the 3D model > export STL > print. It works, but using a dedicated image-to-3D tool directly with your own photo is faster and produces better results because the input is a real reference rather than an AI-generated image.
Free vs Paid: What Do Free Tiers Actually Give You?
"Free image to 3D model AI" is one of the most searched variations of this topic. Here is an honest breakdown of what each free option actually delivers.
Tool | What Free Gets You | Catch | Enough for Casual Use? |
|---|---|---|---|
Hi3D | Unlimited generation, STL export, no signup | 3 generations per hour rate limit | Yes |
MakerWorld MakerLab | Free trials per tool | Credits needed after trials | For testing, yes |
Meshy | 100 credits/month (~5 generations) | CC BY 4.0 license (attribution required) | Barely |
Tripo AI | Limited free credits | Low monthly allowance | For testing, yes |
TRELLIS-2 | Unlimited, forever | Requires your own GPU (12GB+ VRAM) | Yes, if you have hardware |
Luma AI | Free tier available | Slow (5-10 minutes), lower quality | For testing only |
3D AI Studio | Free credits to start | Depletes quickly | For testing only |
My recommendation for zero-budget users: Start with Hi3D to test the concept (no signup, instant results). If you like what you see, use MakerLab's free trials to compare different AI engines. When you are ready to commit, Meshy at $20/month or Tripo at $10/month offers the best value for regular 3D printing use.
When paid is worth it: If you generate more than 5 models per month, the free tiers become too restrictive. A $10 to $20/month subscription to Meshy or Tripo pays for itself quickly when you consider that each successfully printed AI model replaces hours of manual modeling or searching through model libraries for the right 3D print files.
Why AI-Generated Models Often Fail on the First Print
If you have tried printing an AI-generated model and ended up with spaghetti, you are not alone. There are specific reasons why AI models fail more often than manually designed ones, and all of them are fixable.
Problem 1: Non-manifold edges. This is the most common issue. AI models sometimes generate edges shared by more than two faces, which means the slicer cannot determine what is "inside" and "outside" the model. Your slicer may show a warning, or it may silently skip sections. Fix: Meshmixer > Analysis > Inspector > Auto Repair All. Takes 10 seconds.
Problem 2: Walls thinner than 0.8mm. AI does not know about your nozzle diameter. It generates geometry that looks correct on screen but has sections thinner than your printer can physically create. Your slicer simply ignores these sections, leading to missing features in the print. Fix: In Blender, add a Solidify modifier set to at least 1.2mm. In Meshmixer, use the Extrude tool to thicken problem areas.
Problem 3: No flat base. Many AI-generated models have a rounded or irregular bottom because the AI was predicting the shape, not designing for manufacturability. Printing these models requires extensive supports and risks poor bed adhesion. Fix: Meshmixer > Edit > Plane Cut. Position the cutting plane where you want the flat base, and remove the material below it. Alternatively, most slicers can cut the model at the build plate level.
Problem 4: Too many polygons. High-detail AI models can exceed 2 million polygons. Most slicers handle this, but older computers may struggle, and slicing can take 10 to 30 minutes instead of seconds. Fix: Meshmixer > Filters > Reduce. Target 200k to 500k polygons for most prints. You will not see quality loss at typical 3D printing resolutions.
Problem 5: Floating geometry. AI sometimes generates small disconnected pieces of mesh floating near the main model. These print as random blobs or cause the nozzle to travel through empty space. Fix: Meshmixer > Edit > Select All > Ctrl+click the main body > Invert selection > Delete. This removes everything not connected to the primary mesh.
Most of these problems take under 2 minutes to fix once you know what to look for. The key is to always run a quick inspection before sending an AI model to your slicer.
FAQ
Can AI Turn an Image into a 3D Model?
Yes. AI image-to-3D tools in 2026 can generate a 3D model from a single photo in 30 seconds to 3 minutes. The AI predicts the shape of hidden surfaces (back, bottom, sides) based on patterns learned from training data. Tools like MakerWorld MakerLab, Meshy, Tripo AI, and Hi3D all produce results that can be exported as STL files and 3D printed. The quality depends on the clarity of your input image and the complexity of the subject. Simple, well-lit objects with clear shapes produce the best results. The generated models often need minor mesh repair (fixing holes, ensuring watertight geometry) before printing, but several tools now include automated repair features.
Which AI Is Best for 3D Rendering?
For photorealistic 3D rendering, Rodin AI produces the highest-quality output with 4K PBR material maps (base color, roughness, metallic, normal). For game and web rendering, Tripo AI and 3D AI Studio produce clean, optimized meshes in formats (GLB, FBX) ready for real-time engines like Unity and Unreal. For 3D printing specifically (where rendering quality is irrelevant and geometry quality matters most), MakerWorld MakerLab and Meshy are the best options because they focus on watertight, slicer-ready meshes rather than visual surface detail.
Can ChatGPT Convert Image to 3D Model?
No. ChatGPT cannot directly generate 3D model files from images. It is a text and image AI, not a 3D geometry generator. However, ChatGPT can write OpenSCAD code for simple shapes, generate images (via DALL-E) that you then feed into a dedicated image-to-3D tool, and help troubleshoot 3D printing problems. For actual image-to-3D conversion, use a specialized tool like MakerWorld MakerLab (which aggregates five AI engines), Meshy, Tripo AI, or Hi3D (free).
Is AI Good for 3D Modeling?
AI is excellent for generating decorative models, concept prototypes, figurines, organic sculptures, and any shape where approximate geometry is acceptable. A single photo can become a printable 3D model in minutes, which would take hours or days to model manually. AI is not yet reliable for dimensionally precise mechanical parts, objects with specific tolerances, assemblies that need to fit together, or functional engineering components. For those use cases, traditional 3D modeling software like Fusion 360 or FreeCAD remains necessary. The most productive workflow in 2026 combines AI for rapid ideation (turning concepts into rough 3D shapes) with traditional tools for refinement and precision.

Comments ()