Sanding 3D Prints: A Beginner's Step-by-Step Guide to Smooth Finishes
Every FDM print has layer lines. They're a fact of life when plastic is laid down one strip at a time. But they don't have to stay.
Sanding 3D prints is the most reliable way to turn a rough, obviously-printed object into something that looks molded, machined, or even hand-sculpted. It doesn't require expensive tools or special skills — just sandpaper, patience, and the right technique.
This guide walks you through the entire process: what sandpaper for 3d prints to buy, how to work through the grits, material-specific tips for PLA and PETG, and how to get a smooth finish whether you plan to paint afterward or not.
Is Sanding Worth It? When to Sand (and When Not To)
Before you reach for sandpaper, ask: does this print actually need sanding?
Sand when:
- The print is cosmetic (display piece, prop, gift)
- You plan to paint it (paint magnifies imperfections)
- Two parts need to fit together precisely
- Support contact left ugly marks on a visible surface
Skip sanding when:
- It's a functional prototype that nobody will see
- The texture actually looks good (organic/rocky surfaces)
- The model has tiny details that sanding would destroy
- You're printing at 0.1mm layer height and the lines are barely visible already
Alternatives to consider:
- Filler primer spray — fills small lines without manual sanding (good for lazy/quick finishing)
- Acetone vapor smoothing — ABS only, chemically melts surface smooth in minutes
- Epoxy coating — brush on a self-leveling resin coat (XTC-3D)
- Reprint with better settings — sometimes 5 minutes in the slicer saves 30 minutes of sanding
If you decide to sand, read on.
Print Settings That Reduce Sanding Work
The best sanding job is the one you don't have to do. These slicer settings minimize how much post-processing your print needs:
Setting | What It Does | Sanding Impact |
|---|---|---|
Layer height 0.12mm (instead of 0.2mm) | Smaller steps between layers | 50% less visible lines, cuts sanding time in half |
Print orientation | Face the "show surface" upward or at 45° | Avoids support scars on the visible side |
Ironing (Cura / OrcaSlicer) | Passes the hot nozzle over top surfaces to melt them flat | Top surfaces need zero sanding |
Z-seam position: hidden | Places the layer-start blob in a rear corner | No visible seam line to sand off |
3+ walls / perimeters | Thicker shell around the print | More material to sand into without breaking through |
Bottom line: Spend 5 minutes tweaking these settings before printing, and you'll cut your sanding time dramatically. Want to reduce post-processing even further? Printing your things to 3D print at 0.12mm layer height with ironing enabled gets you 80% of the way to smooth without touching sandpaper.
What You Need: Tools and Sandpaper for 3D Prints
Here's your shopping list. Total cost: under $20 for everything.
Essential:
- Sandpaper variety pack (120, 220, 400, 600, 800, 1000 grit) — look for "wet/dry" type
- Sanding sponge (medium + fine) — for curved surfaces
- Bowl of water — for wet sanding
- Flush cutters or craft knife — for removing support nubs before sanding
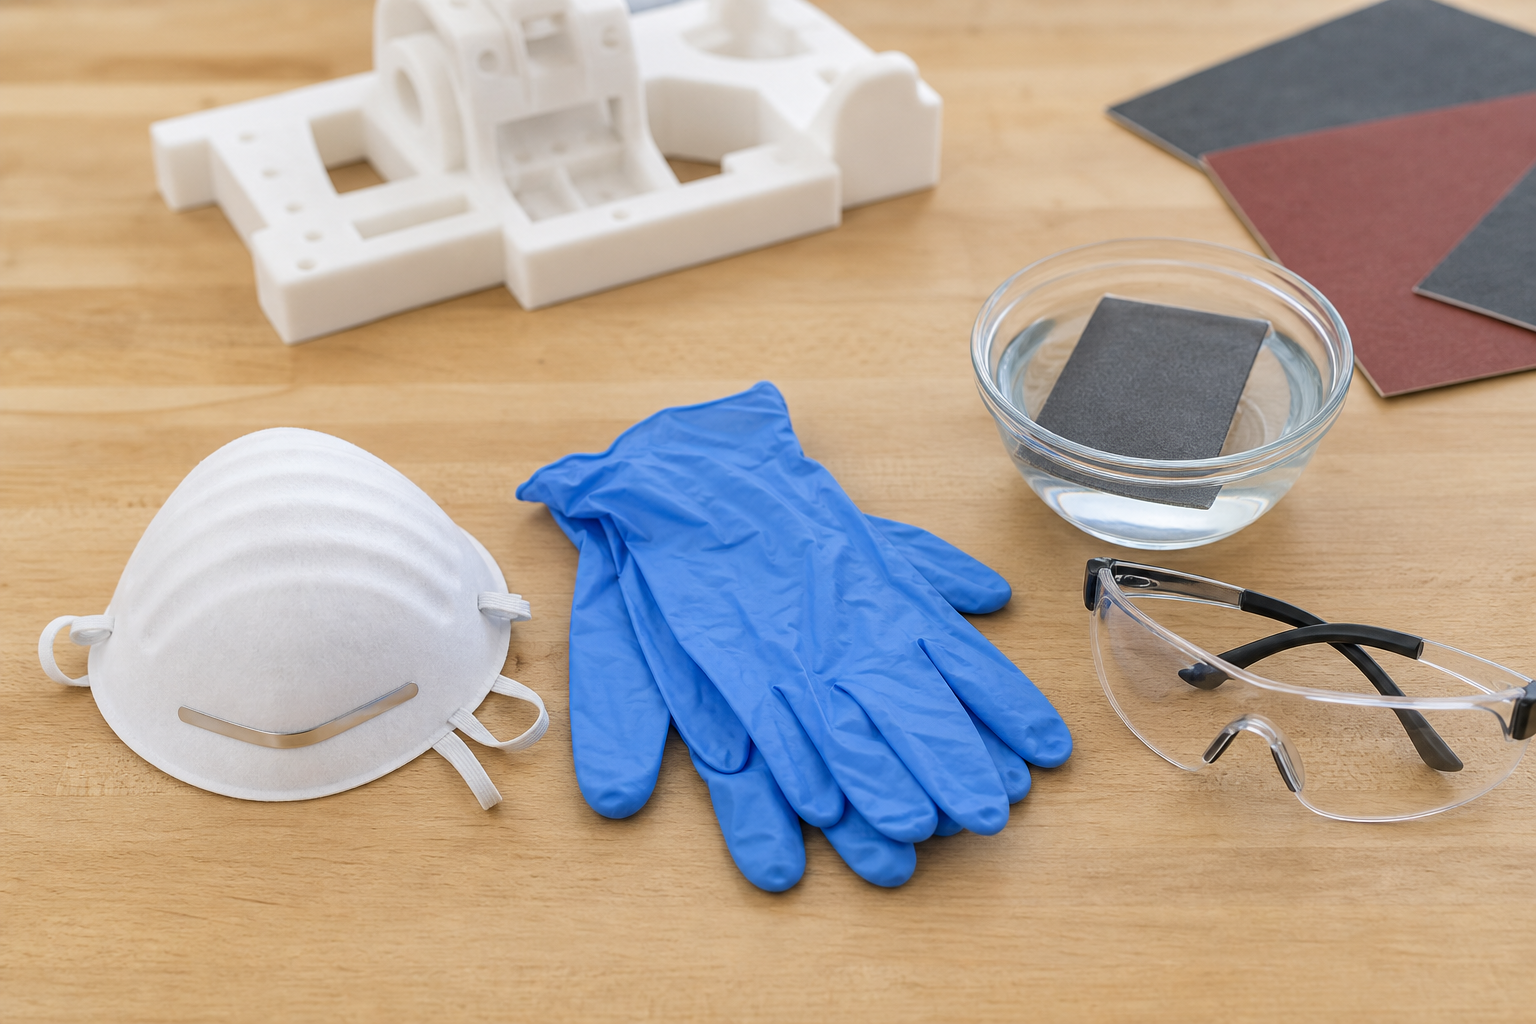
- N95 mask — non-negotiable for dry sanding
Nice to have:
- Sanding block (or wrap sandpaper around a flat eraser) — for even pressure on flats
- Needle files — for inner corners and small slots
- Rotary tool (Dremel) with sanding drum — for large prints or rough shaping
- Microfiber cloth — for wiping between grits
- Spray bottle — easier than dunking for wet sanding
Where to buy sandpaper for 3d printing: Any hardware store carries wet/dry sandpaper sheets. For convenience, search "3D print sandpaper variety pack" on Amazon — you'll find packs with 10+ grits specifically marketed for this purpose. They work identically to standard automotive sandpaper.
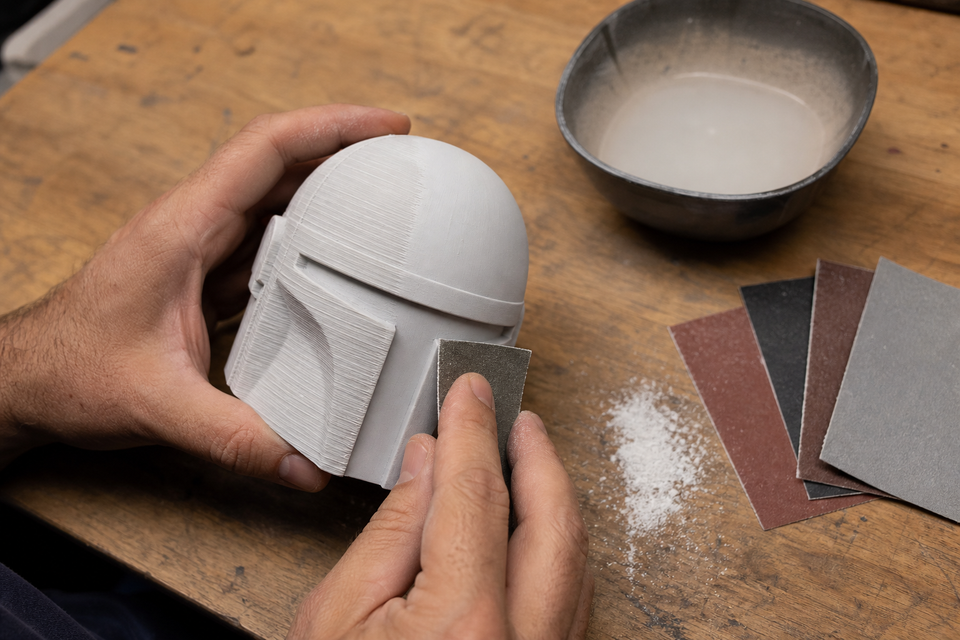
How to Sand 3D Prints: Step-by-Step
Step 1: Prep the Print
Before any 3d print sanding begins, clean up the obvious stuff:
- Clip support structures flush with cutters
- Trim any blobs, stringing, or seam bumps with a craft knife
- If there are deep holes or layer gaps, fill them with automotive spot putty (Bondo) and let dry
- Inspect the print — identify which surfaces actually need sanding (often it's not all of them)
One thing sanding can't fix: a low-resolution model with visible polygon facets. If you downloaded a low-poly file, no grit will make those flat faces round. Make sure you're starting with a properly exported 3D printer file type before investing time in sanding.
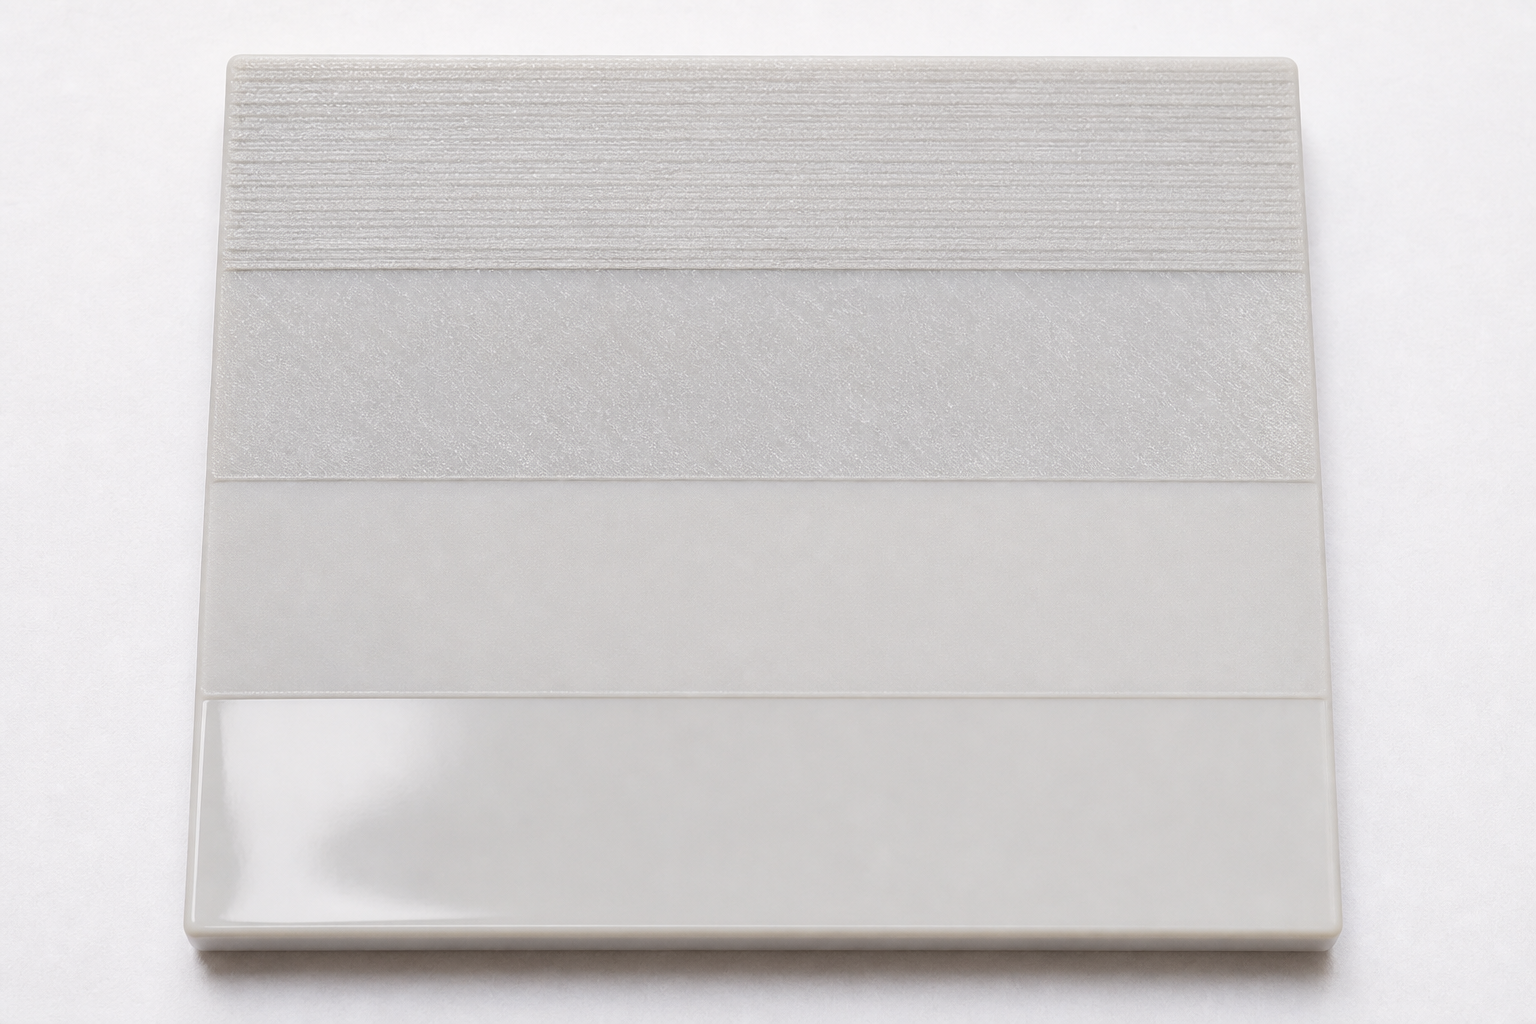
Step 2: Rough Sanding (120–220 Grit)
Goal: Eliminate visible layer lines and support scars.
Technique: Sand in straight strokes along the longest dimension of each surface. Don't sand in circles yet — straight strokes cut layer lines most efficiently at this stage. Use light pressure and let the sandpaper do the work. If you press hard on PLA, friction heat will smear the plastic instead of cutting it.
What it looks like after: The surface is matte and uniformly scratched. Layer lines are gone, but you can feel the coarse scratches. The print won't look "smooth" yet — that's normal.
Time: 5–10 minutes for a fist-sized print.
Step 3: Medium Sanding (320–400 Grit)
Goal: Remove the scratches left by the previous grit.
Technique: Change direction 90° from Step 2. This cross-hatching pattern helps you see when the old scratches are gone (they'll run perpendicular to your current strokes). This is where you can begin to sand 3d print surfaces that need precision.
What it looks like after: Smooth to the touch. No individual scratch visible to the naked eye. Still matte.
Time: 5–8 minutes.
Step 4: Fine Sanding (600–800 Grit)
Goal: Achieve a satin-smooth surface. This is where you switch to wet sanding.
Technique: Dip the sandpaper in water (or use a spray bottle). Sand with light, even strokes. The water acts as lubricant — it prevents clogging, reduces heat, and traps dust. Rinse the part and paper every 30 seconds.
What it looks like after: Slight sheen. Surface feels like smooth plastic (because it is). No visible scratches. If you stop here without painting, you get a clean satin finish.
Time: 5–8 minutes.
Step 5: Ultra-Fine / Polish (1000–2000+ Grit) — Optional
Goal: Mirror-like or glass-smooth surface. Only needed if you want a high-gloss finish or are prepping for clear coat / metallic paint.
Technique: Wet sanding only. Very light pressure. After 2000 grit, you can apply polishing compound (like car polish) with a soft cloth for extra shine.
What it looks like after: Reflective. The surface no longer looks or feels 3D-printed. Origin is undetectable.
Time: 5–10 minutes.
Wet Sanding 3D Prints: Why and How
Wet sanding is the single biggest upgrade to your sanding technique. Start wet from 400 grit onward (some people start at 320).
Why wet sanding is better:
- Water flushes away plastic dust → sandpaper stays sharp longer
- Less heat generated → no risk of melting PLA/PETG
- Smoother result → water fills micro-scratches during sanding
- Far less airborne dust → safer for your lungs
How to do it:
- Fill a bowl with room-temperature water
- Dip sandpaper in water for 10 seconds before starting
- Sand the print, re-dipping every 10–15 strokes
- You'll see a milky slurry form — that's dissolved plastic (good)
- Rinse the print under water before switching to the next grit
- Pat dry with a towel to inspect your progress
Tip: Don't use hot water. Warm/hot water can soften PLA enough to deform thin features.
Sanding by Material
Sanding PLA
PLA is the most common filament — and most free models from Thingiverse alternatives are printed in PLA — so sanding pla is what most beginners learn first. It works well, but has one quirk: it's heat-sensitive.
PLA-specific tips:
- Go slow. Fast, aggressive strokes create friction heat that melts and smears the surface.
- Wet sand from 400 grit onward to keep temperatures down.
- Avoid Dremel on PLA unless you're very careful with speed (under 5,000 RPM). Rotary tools generate too much heat.
- Sanding pla plastic feels "waxy" when you get to fine grits — that's normal, it means you're getting smooth.
Grit progression for PLA: 150 → 220 → 400 (switch to wet) → 600 → 800 → 1000 (optional)
Result: Satin-smooth at 800. Semi-gloss at 1000+. True gloss requires clear coat spray.
Sanding PETG
PETG is tougher than PLA but gummier. This sanding petg guide will save you frustration:
PETG-specific tips:
- Always wet sand. PETG clogs sandpaper fast when dry. Water prevents this.
- Rinse constantly — every 5–10 strokes. PETG produces a sticky residue.
- Don't press hard. PETG deforms under heat even faster than PLA.
- Expect slower progress. The material is more resilient, so each grit stage takes longer.
Grit progression for PETG: 120 → 220 → 400 (wet) → 600 → 800
Result: Smooth at 600–800. Polishing PETG further is possible but diminishing returns.
Sanding ABS
ABS is the easiest filament to sand. It's rigid, heat-resistant, and sands predictably.
ABS-specific tips:
- Can handle more pressure and speed than PLA/PETG
- Dremel-friendly at moderate speeds (8,000–10,000 RPM)
- Alternative: skip sanding entirely with acetone vapor smoothing (ABS only — doesn't work on PLA)
- Polishes to a genuine gloss at 1500+ grit
Grit progression for ABS: 120 → 220 → 400 → 600 → 800 → 1200+ (for gloss)
Sanding Resin Prints (SLA/DLP)
Resin prints start much smoother than FDM — you're mostly sanding support marks and very fine layer lines.
Resin-specific tips:
- ALWAYS wet sand. Resin dust is a respiratory irritant and potential sensitizer. No exceptions.
- Start at 220 (or even 320 if layer lines are minimal)
- Can achieve glass-clear finishes at 2000+ with polishing compound
- Handle uncured resin with gloves — always fully cure before sanding
Sanding Different Shapes (Technique by Geometry)
Not every surface sands the same way. Here's how to approach different part geometries:
Flat Surfaces
Use a sanding block (or wrap paper around a flat object). This distributes pressure evenly and prevents you from sanding "valleys" into the surface. Long, straight strokes — no circular motion.
Curved Surfaces
Use sanding sponges or fold the sandpaper and press with your fingers, following the curve. Flexible-backed sandpaper conforms better than stiff sheets. Sand in the direction of the curve, not across it.
Recessed Details / Inner Corners
Roll sandpaper into a tight tube or use needle files. For tight slots, cut a thin strip of sandpaper and pull it back and forth like floss. A Dremel with a small sanding bit works here too.
Thin Walls / Delicate Parts
Skip the coarse grits — start at 320 or 400. Support the thin wall from behind with your finger to prevent flexing. Ultra-light pressure only. If the wall is under 1.5mm thick, consider skipping sanding and using filler primer spray instead.
Sanding 3D Prints with a Dremel
A rotary tool speeds things up dramatically on large prints, but it's easy to overdo it.
When to use a Dremel:
- Rough shaping (grinding down big support nubs)
- Sanding inside holes or cylindrical surfaces
- Large flat areas on ABS or PETG
- When you have 10+ identical prints to process
Recommended attachments:
- Sanding drums (60–240 grit) — for flat/convex surfaces
- Flap wheels — gentler, for blending transitions
- Polishing wheels + compound — for final gloss on ABS
Critical rules:
- Speed: LOW. 5,000–10,000 RPM maximum. Higher melts plastic.
- Keep moving. Never hold the Dremel in one spot — you'll gouge instantly.
- Not for PLA. PLA's low melting point makes Dremel use extremely risky. Stick to hand sanding for PLA.
- Wear eye protection. Plastic chips fly.
How to Smooth Edges of 3D Print Without Painting
Not every sanded print needs paint. If you want smooth results while keeping the natural filament color, here's how to smooth edges of 3d print and surfaces without any coating:
Level 1: Satin finish (easiest) Sand to 600–800 grit. Stop. The surface will be smooth to the touch with a matte/satin appearance. This is the fastest "good enough" result.
Level 2: Semi-gloss (more work) Sand to 1000–1500 grit with wet sanding. The natural plastic starts to develop a subtle sheen. Works best on dark-colored filaments.
Level 3: Gloss (ABS/PETG only) Sand to 2000 grit, then apply automotive polishing compound with a microfiber cloth. Buff in circles. ABS and PETG can achieve genuine gloss this way. PLA cannot — its crystal structure doesn't polish to true transparency.
Level 4: Protected smooth (any material) Sand to 800, then spray one coat of matte or satin clear coat. This protects the surface, evens out the sheen, and you can't tell it was 3D printed. Technically involves a "spray" but no color change.
Safety: Microplastics and Dust When Sanding 3D Prints
Sanding 3D prints generates fine plastic particles — microplastics — that are harmful to inhale. This isn't optional safety theater; it's genuinely important.
What you're breathing in:
- PLA dust: low toxicity but still a respiratory irritant
- ABS dust: contains styrene, a known irritant, possible carcinogen with long-term exposure
- PETG dust: glycol-modified polyester particles, mild irritant
- Resin dust: the worst — uncured photopolymer dust is a skin and lung sensitizer
Minimum safety setup:
Protection | When Required |
|---|---|
N95 respirator | Any dry sanding session, any material |
Nitrile gloves | Always with resin; recommended for all materials |
Safety glasses | Whenever using a Dremel; recommended for all |
Ventilation | Always — open window, fan, or outdoor sanding |
Wet sanding drastically reduces risk — water traps 95%+ of airborne particles. This is why this guide recommends switching to wet sanding as early as 400 grit.
Cleanup:
- Wipe surfaces with a damp cloth (don't sweep — sweeping re-aerosolizes dust)
- Don't vacuum unless you have a HEPA-filter vacuum
- Don't sand near food, pets, or in your bedroom
- Wash hands and forearms thoroughly after sanding
FAQ
Can 3D printed items be sanded?
Yes. Virtually all 3D printed materials can be sanded — PLA, ABS, PETG, Nylon, and resin all respond well to sandpaper. The technique varies slightly between materials (PLA needs gentler handling, resin requires wet-only sanding), but the fundamental process of working through progressively finer grits applies to everything. If your printer can print it, you can sand it.
Is sandpaper good for 3D prints?
Sandpaper is the single best tool for smoothing 3D prints. It gives you complete control over how much material you remove and exactly where. Compared to chemical smoothing (which only works on ABS) or filler primers (which add thickness), sandpaper for 3d prints works universally on any material and any geometry. Standard wet/dry automotive sandpaper from any hardware store works perfectly — you don't need anything special.
Is PLA difficult to sand?
PLA is moderately easy to sand — certainly not difficult for a beginner. The main challenge is heat: if you sand too aggressively, friction melts the surface and smears it instead of cutting cleanly. The fix is simple: use light pressure, go slow, and switch to wet sanding from 400 grit onward. Compared to PETG (which is gummier) or Nylon (which is very hard), PLA is actually one of the more forgiving materials to sand.
What is the best thing to sand 3D prints with?
For most beginners, standard wet/dry sandpaper sheets in grits 120 through 1000 are all you need. A sanding sponge helps on curves. If you want to invest in one upgrade, get a variety pack of sanding sponges (coarse, medium, fine, superfine) — they conform to shapes better than flat sheets and last longer. Avoid steel wool (too aggressive) and magic erasers (too fine to remove layer lines).
What grit sandpaper for 3D prints PLA?
Start at 150–220 grit to remove layer lines, then progress through 320, 400, 600, and 800 grit for a smooth finish. Switch to wet sanding at 400+. For paint prep, stop at 600. For unpainted satin finish, stop at 800–1000. Going finer than 1000 on PLA offers minimal visible improvement without a clear coat.
How to smooth 3D prints without sanding?
Several alternatives exist: (1) Filler primer spray — fills small layer lines chemically, just spray and let dry. (2) Acetone vapor smoothing — ABS only, melts the surface smooth in a sealed container. (3) XTC-3D epoxy coating — brush-on self-leveling resin that fills lines. (4) Heat gun (very carefully) — briefly passing heat over PLA can soften layer lines, but risks warping. (5) Better print settings — 0.1mm layer height with ironing enabled produces near-smooth results straight off the bed.
Quick Reference: Grit Progression by Material
Material | Rough (remove lines) | Medium (smooth) | Fine (satin finish) | Ultra-fine (gloss/paint prep) |
|---|---|---|---|---|
PLA | 150–220 | 320–400 | 600–800 | 1000 (clear coat for gloss) |
PETG | 120–220 | 320–400 | 600–800 | 1000 (polishable) |
ABS | 120–220 | 320–400 | 600–800 | 1200–2000 (polishes to gloss) |
Resin | 220–320 | 400–600 | 800–1000 | 1500–2000+ (glass clarity) |
Nylon | 120–180 | 220–320 | 400–600 | Stays matte regardless |
Start wet sanding at 400 grit for all materials. Total time for a fist-sized print: 20–40 minutes from start to 800-grit finish.

Comments ()