How to Use 3D Printing in Architecture: From Scale Models to Full-Size Buildings
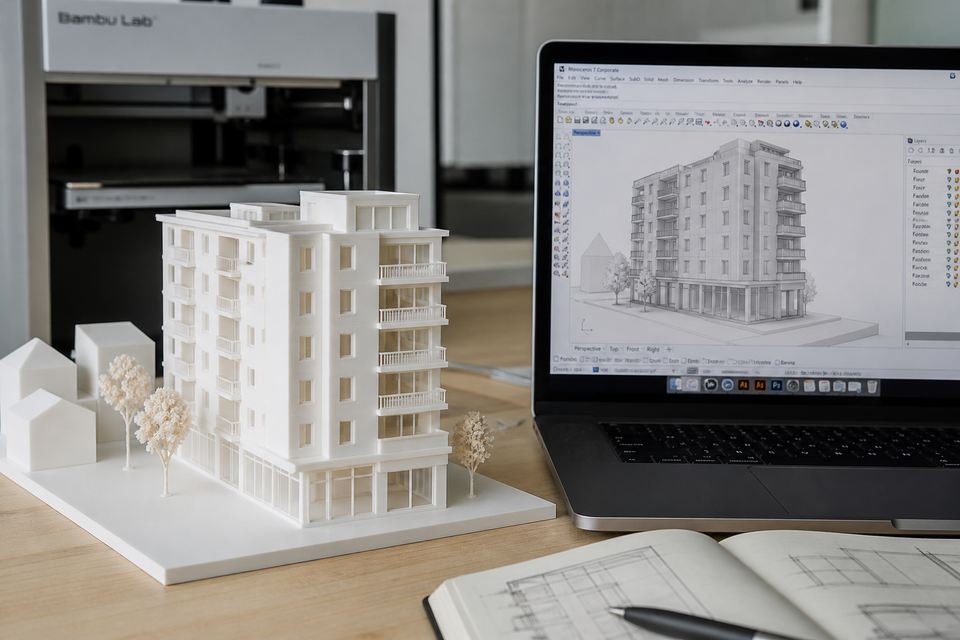
3D printing has become one of the most valuable tools in architecture, working at two very different scales. On one end, architects use desktop printers to produce detailed scale models in hours instead of weeks. On the other, construction companies print entire houses with room-sized concrete extruders.
Understanding how to use 3d printing in architecture starts with knowing which application matches your goals. If you are a student preparing a presentation, you need a practical model-making workflow. If you are a homebuyer curious about 3D printed houses, you want to know what is actually possible today versus what is still in development.
This guide covers both sides: the hands-on process of making 3d printed architectural models, and the bigger picture of what 3d-printed architecture means for the construction industry in 2026.
How Do Architects Use 3D Printing Today?
Architects integrate 3D printing into their workflow at three distinct stages, each serving a different purpose in the design and construction process.
Concept and Iteration Models
During early design phases, architects need to test ideas quickly. A concept model does not need fine detail; it needs to communicate spatial relationships, massing, and proportions. FDM printers produce these rough study models in 2-4 hours using inexpensive white PLA, allowing a studio to print three or four design variations overnight and compare them the next morning.
This speed transforms how architects iterate. Where traditional model-making might allow one or two physical versions of a concept, 3D printing lets teams produce dozens of iterations at minimal cost. The Renzo Piano Building Workshop, one of the world's most prestigious architecture firms, uses 3D printing precisely for this reason: their models change daily, sometimes hourly, and hand-carving simply cannot keep pace.
Presentation and Competition Models
When a project reaches the client presentation stage or an architectural competition submission, detail matters. 3D printed building models at this level use resin printers that capture window mullions, facade textures, railings, and even interior furniture at scale. These presentation models combine 3D printed elements with laser-cut bases, etched acrylic for glazing, and landscaping materials for a polished, professional result.
Full-Scale Construction Components and Buildings
The most dramatic application is 3d printing architectural design at full scale. Companies like ICON, COBOD, and Winsun use gantry systems or robotic arms to extrude concrete, clay, or polymer mixtures layer by layer, constructing walls for actual habitable structures. This is what people mean when they ask "what is 3d-printed architecture" in the news.
We cover this in detail later in the guide, but the key point is: this is an industrial process requiring machines that cost $100,000-500,000+, not something you do with a desktop printer.
3D Printed Architectural Models: A Step-by-Step Guide
Here is the practical workflow for creating your own architectural model using a desktop 3D printer, whether you are a student, a practicing architect, or a hobbyist who wants to recreate a famous building.
Step 1: Choose Your Scale
Scale determines everything: how much detail is visible, how large your model will be, and whether it fits on a single build plate.
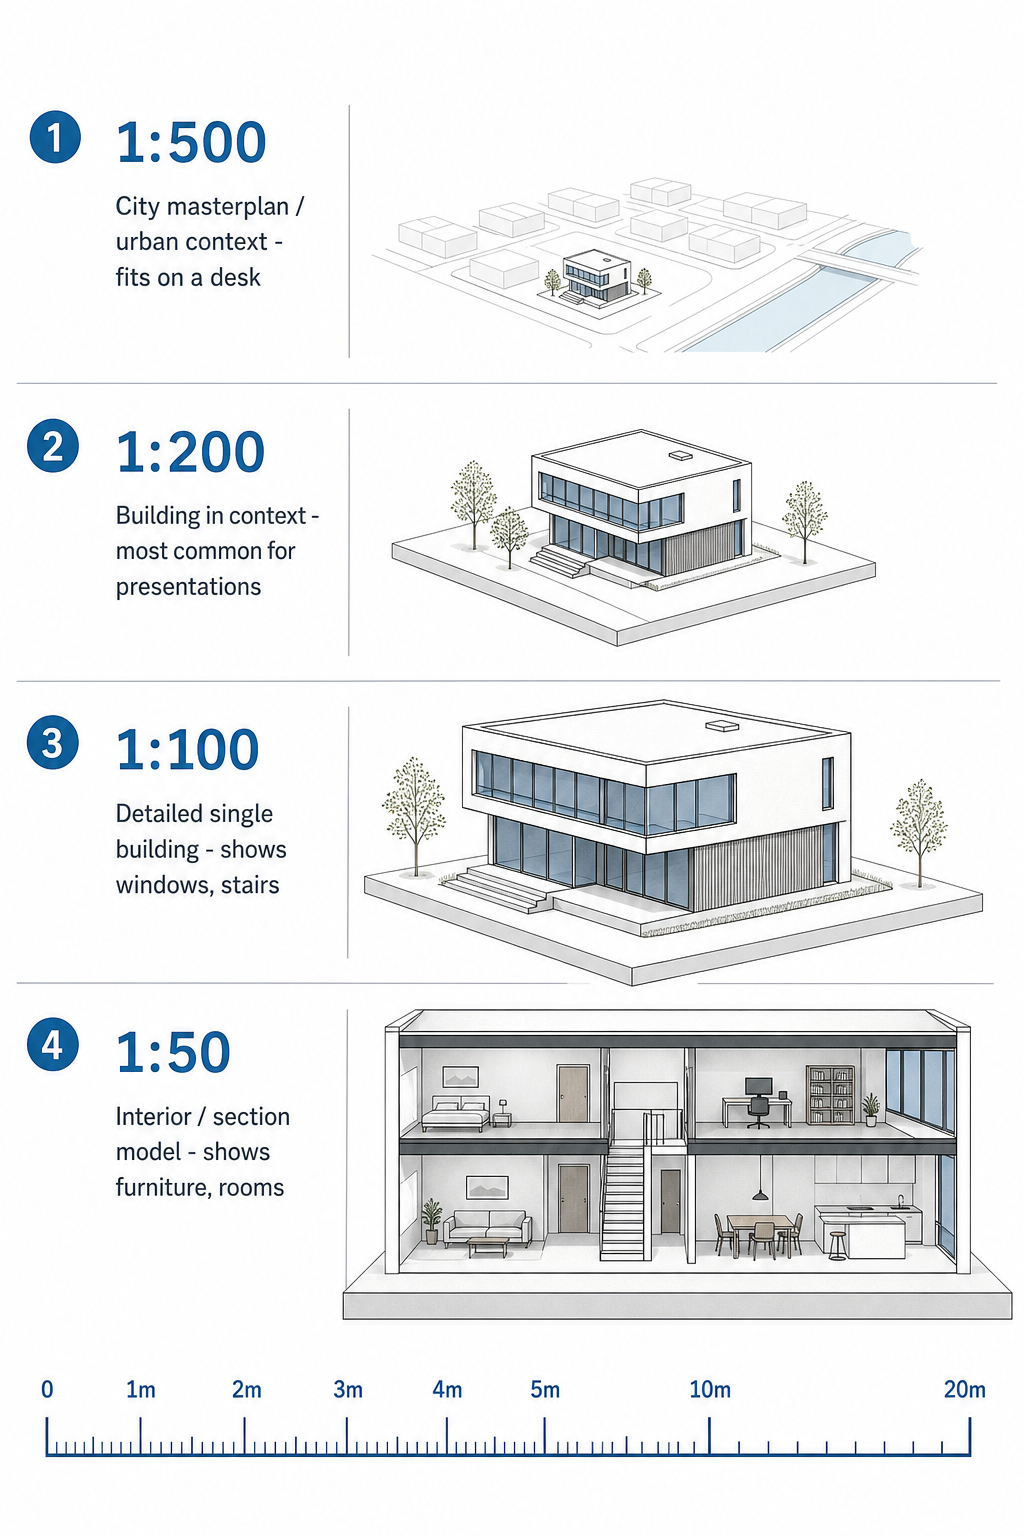
Scale | Real-World Size of Model | What It Shows | Common Use |
|---|---|---|---|
1:500 | 20m building = 40mm tall | Urban context, city blocks, massing | Masterplans, site context |
1:200 | 20m building = 100mm tall | Building form, floor plates, major openings | Client presentations, design reviews |
1:100 | 20m building = 200mm tall | Windows, stairs, balconies, material zones | Detailed presentations, competitions |
1:50 | 20m building = 400mm tall | Interior layouts, furniture, wall thickness | Section models, interior design |
Practical tip: In your slicer or CAD software, scaling is simple multiplication. A building modeled at 1:1 (full size) in Revit needs to be scaled to 0.5% for 1:200, or 1% for 1:100. Most slicers also accept direct dimension input if you prefer to type the target size.
Minimum printable detail by scale:
- At 1:500, walls thinner than 0.8mm will not print reliably on FDM. Simplify heavily.
- At 1:200, minimum feature size is about 1mm. Window frames become visible.
- At 1:100, you can print 0.5mm features on FDM (or 0.3mm on resin). Most architectural detail reads clearly.
Step 2: Prepare Your CAD File for 3D Printing
Your architectural CAD model is not automatically ready to print. It needs preparation depending on which software you use.
From BIM software (Revit, ArchiCAD):
- Remove elements invisible at your chosen scale: MEP systems, internal ductwork, double-glazing assembly details, hidden structural connections
- Thicken walls that are too thin at scale (a 100mm partition at 1:200 = 0.5mm, which may not print. Thicken to 1mm minimum)
- Close all open surfaces to create a "watertight" solid
- Export as STL or 3MF using Revit's built-in export or a plugin like Formit/Dynamo
From surface modelers (Rhino, SketchUp, Blender):
- Check for non-manifold geometry (holes, flipped normals, intersecting faces)
- Run a "mesh repair" tool (Rhino: MeshRepair command, SketchUp: Solid Inspector plugin)
- Boolean-union all separate surfaces into one solid if needed
- Export as STL at high resolution (fine mesh, not coarse)
From online tools (for terrain and famous buildings):
- Download STL directly from model repositories
- Check wall thickness and scale before printing
- Use a free STL editor like Meshmixer to repair or modify
For a broader overview of which file formats work with 3D printers, see our file types guide.
Step 3: Split Large Models for Printing
Most desktop 3D printers have a build volume around 200-256mm in each direction. A building model at 1:100 will almost certainly exceed this. The solution is splitting.
Where to split:
- Floor slabs make natural horizontal cuts (each floor becomes a separate print)
- Building wings or separate volumes can be isolated
- Terrain/base plate prints separately from the building
Assembly strategies:
- Pin joints: Add 2-3mm diameter holes at split points. Insert brass pins or pieces of filament during glue-up for precise alignment.
- Magnet inserts: Embed small neodymium magnets so floors can be removed to reveal interiors.
- Friction fit: Design a 0.1-0.2mm tolerance slot-and-tab system at split lines.
Labeling: When printing 20+ parts for a complex model, number them. Write the part number on the build plate side with a marker, or print a tiny number into the geometry.
Step 4: Print and Post-Process
Material selection for architectural models:
Material | Finish | Best For |
|---|---|---|
White PLA (matte) | Clean, uniform, easy to paint | Concept models, massing studies |
White/Gray Resin (SLA) | Ultra-smooth, crisp edges | Presentation models, competitions |
Clear Resin | Translucent, glass-like | Glazing elements, skylights, atria |
Wood-fill PLA | Organic, warm texture | Landscape elements, timber structures |
Support strategy: Architectural models often have overhangs (balconies, cantilevers, roof forms). Use tree supports with low density for easy removal. Orient the model so the most detailed facade faces upward and the least visible face sits on the bed.
Post-processing workflow:
- Remove supports carefully with flush cutters
- Sand support marks with 200-400 grit sandpaper
- Fill gaps at assembly joints with modeling putty or white acrylic filler
- Prime with white spray primer (unifies color across joined parts)
- Optional: paint specific elements (glazing in metallic blue, landscaping in green, etc.)
For detailed finishing techniques, see our guides on sanding 3D prints and painting 3D prints.
Best 3D Printer for Architects (2026 Recommendations)
The right 3d printer for architects depends on your budget, the detail level you need, and how large your models typically are.
Budget Tier: FDM Printers for Architecture Students ($200-500)
If you are a student or early-career architect, a $200-500 FDM printer handles 90% of model-making needs. You give up ultra-fine detail but gain speed, low material cost, and large build volumes.
Bambu Lab A1 Mini (~$250)
- Build volume: 180x180x180mm
- Layer resolution: 0.08mm minimum
- Why architects like it: Fast (up to 500mm/s), reliable, minimal calibration, great software
- Best for: Concept models, massing studies, quick iterations
Bambu Lab A1 (~$400)
- Build volume: 256x256x256mm
- Larger bed fits most 1:200 models in a single print
- Same speed and reliability as A1 Mini
- Best for: Presentation models that need more build space
Creality Ender 3 V3 (~$200)
- Build volume: 220x220x250mm
- Extremely affordable entry point
- Large community for troubleshooting
- Best for: Budget-conscious students learning the workflow
Professional Tier: Resin Printers for Presentation Models ($300-3,500)
When you need crisp edges, invisible layer lines, and detail that reads clearly at 1:200 scale, resin printing is the answer. Client presentations, competition submissions, and exhibition models benefit from SLA/LCD quality.
Elegoo Saturn 4 Ultra (~$400)
- XY resolution: 19 microns (captures the finest facade detail)
- Build volume: 218x123x260mm
- Affordable entry into professional-quality results
- Best for: Detailed facades, ornamental elements, high-quality presentation models
Formlabs Form 4 (~$3,500)
- The industry standard 3d printer for architectural models
- Fast Model Resin prints large models in under 2 hours
- Exceptional surface finish, minimal post-processing
- Used by: Renzo Piano Building Workshop, BIG, Foster + Partners
- Best for: Firms needing consistent, reliable quality for client-facing models
Large Format: For Big Models Without Splitting ($600-1,500)
Splitting and reassembling models is time-consuming. If your studio produces many 1:100 or larger models, a large-format printer saves significant assembly time.
- Bambu Lab A2L: 400mm+ build height, ideal for tall buildings at 1:100
- Creality K2 Plus: 350x350x350mm, one of the largest enclosed FDM printers
- Bambu Lab P1S: 256x256x256mm with enclosed build for consistent results
3D Printed Site Models: How to Create Terrain
A 3d printed site model includes not just the building but the surrounding landscape: terrain contours, roads, water features, and neighboring structures. This context is what makes a presentation model convincing.
Generating Terrain from GIS Data (Free)
You do not need expensive GIS software. These free online tools convert real-world topography into printable STL files:
Terrain2STL (terrain2stl.com)
- Select any location on an interactive map
- Choose your area extent and vertical exaggeration
- Download an STL file of the terrain ready to print
- Best for: Quick site context models showing hills, valleys, coastlines
TouchTerrain (touchterrain.geol.iastate.edu)
- More control over resolution, scale, and tile splitting
- Can export large areas as multiple tiles that assemble into one model
- Supports vertical exaggeration for subtle terrain
- Best for: Larger site models, academic projects, precise topography
Printing Terrain Models
Solid terrain: Print the STL as a solid block. This gives a heavy, sturdy base. Print with the flat bottom on the bed (no supports needed for terrain surfaces since they are all convex from above).
Contour-stacked: Alternatively, laser-cut or 3D print individual contour layers and stack them. This gives a stepped appearance that is architecturally conventional and immediately readable as topography.
Scale matters: Site models are typically 1:500 or 1:1000. At these scales, vertical terrain differences are subtle. Use 2x-5x vertical exaggeration to make slopes visible in the model.
Hybrid Models: Combining 3D Print with Other Materials
Many architecture studios use a hybrid approach for site models:
- 3D printed: The primary building, complex sculptural forms, trees/vegetation, custom fixtures
- Laser cut: Base plates, context buildings (simple box forms), road layouts
- Hand-made: Landscaping (model railroad grass/foam), water features (clear resin or blue acrylic sheet)
This combination leverages the strengths of each method: 3D printing for complexity, laser cutting for flat precision, and hand-finishing for texture and atmosphere.
Free 3D Printable Architecture Files
You do not need CAD skills to 3D print architectural models. Thousands of free files are available for download:
Famous Buildings (Ready to Print)
Search these platforms for iconic structures:
- Printables.com: Eiffel Tower, Colosseum, Parthenon, Big Ben, Notre Dame, Burj Khalifa
- Thingiverse.com: Taj Mahal, Sagrada Familia, Fallingwater, Sydney Opera House
- MakerWorld: Growing collection of architectural models with print profiles included
Tip: Search "architecture" or the specific building name. Filter by "most makes" to find models that others have successfully printed. Check the comments for scale information and print tips.
Template Buildings for Site Models
For urban context models, you need generic building volumes at consistent scales:
- Search "scale model buildings 1:200" or "N scale buildings" (N gauge = approximately 1:160, close enough for architectural context)
- Generic row houses, apartment blocks, and commercial buildings are available as parametric files
- Model railroad communities have decades of STL resources at common architectural scales
Trees, Cars, People (Scale Figures)
Every site model needs context elements:
- Trees: Search "model tree 1:200" or "architectural scale tree"
- People/figures: "scale figures" or "architectural silhouettes"
- Cars: "1:200 car" or "scale vehicle"
- Street furniture: benches, lamp posts, bollards
These are best printed on a resin printer for fine detail, or purchased as pre-made model railroad accessories if speed is more important.
3D Printing Architectural Design: Software Workflow
The path from digital design to physical model varies depending on your software ecosystem. Here is how to use 3d printing in architecture with each major platform.
From BIM (Revit, ArchiCAD) to 3D Print
Revit workflow:
- Create a 3D view showing only elements relevant to the model (hide MEP, structural connections, detail items)
- Use "Section Box" to crop the model to the area you want to print
- Export via: File > Export > CAD Formats > STL (requires Dynamo script or plugin), OR use the free "STL Exporter" plugin from the Autodesk App Store
- Import the STL into your slicer, scale to target size, and print
ArchiCAD workflow:
- Use the "3D Document" tool to control which elements are visible
- File > Save As > .obj or .stl format
- Open in Meshmixer to check for mesh errors and repair if needed
- Import into slicer
Common BIM pitfalls:
- Doors and windows export as separate objects (boolean them into walls or simply fill window openings for small-scale models)
- Floor slabs may export at actual thickness (2-3mm at 1:200 = impossibly thin). Thicken to minimum 1mm.
- Curtain wall mullions disappear at small scales. Either thicken them or represent glazing as a flat panel.
From Rhino / Grasshopper to 3D Print
Rhino is the preferred tool for many architecture studios because its mesh handling is excellent:
- Select all geometry for your model
- Run "MeshBooleanUnion" to combine into one solid (or export as separate components for multi-part assembly)
- Run "Check" to verify the mesh is closed and valid
- Export as STL (Binary format, fine mesh density)
- Import directly into your slicer
Grasshopper (Rhino's visual programming plugin) can automate the entire export pipeline, including automatic scaling, splitting at floor lines, and adding alignment features.
From SketchUp to 3D Print
SketchUp is popular with students for its accessibility:
- Use the "Solid Inspector" plugin to check your model for errors (install from Extension Warehouse)
- Ensure all geometry forms a "solid group" (SketchUp's term for watertight)
- Export as STL: File > Export > 3D Model > STL
- Open in your slicer and scale appropriately
SketchUp limitation: Complex curves and organic forms can produce very high-polygon STL files. Use the "Artisan" or "SubD" plugins to control mesh density before export.
From GIS Data to Terrain STL
For STL to G-code conversion of terrain models:
- Visit Terrain2STL.com or TouchTerrain
- Navigate to your site location
- Set the area boundaries and vertical scale
- Download the STL
- Import into your slicer, add a flat base if needed, and print
What Is 3D-Printed Architecture? (Full-Scale Buildings)
Beyond desktop models, 3D printing is transforming actual construction. Here is what "3d-printed architecture" means at building scale.
How 3D Printed Houses Are Built
The process uses industrial-scale systems:
- Design: Architects create the building in CAD, optimizing wall geometry for the layer-by-layer process (curved walls are as easy as straight walls for a printer)
- Material preparation: A specialized concrete mix (or clay/polymer composite) is engineered for optimal flow and rapid hardening
- Printing: A gantry system or robotic arm moves along programmed paths, extruding material in continuous layers (each layer typically 10-30mm thick, 50-100mm wide)
- Reinforcement: Steel rebar, fiber reinforcement, or post-tensioning cables are added between layers or in hollow channels
- Completion: Roof structure, windows, doors, electrical, plumbing, and finishes are installed traditionally
Timeline: Wall structures for a single-story house can be printed in 24-72 hours. Total construction (including traditional elements) takes 2-8 weeks, compared to 6-12 months for conventional building.
Notable 3D Printed Building Projects (2026)
ICON (Austin, Texas, USA)
- Printed multiple residential communities in Texas
- 1,700-2,000 sq ft homes, hurricane-resistant walls
- Price range: $200,000-400,000 (comparable to conventional in their market)
- Technology: Vulcan printer system, proprietary Lavacrete material
COBOD (Denmark/Global)
- Multi-story buildings (3+ floors) in Europe and Middle East
- BOD2 printer: largest construction 3D printer, 15m wide
- Partnered with General Electric for wind turbine base printing
TECLA (Massa Lombarda, Italy)
- Designed by Mario Cucinella Architects
- Printed entirely from local clay (zero-km materials)
- Fully recyclable, minimal carbon footprint
- Demonstrates vernacular material + digital fabrication
Habitat for Humanity + Alquist 3D
- Affordable housing for low-income families in Virginia, USA
- 3D printed walls reduce labor costs by 15-30%
- First 3D printed homes in the US permitted through traditional building codes
Can You 3D Print Your Own House?
Current reality: No, this is not a DIY project. The machines cost $100,000-500,000+, require specialized concrete mixes, engineering oversight, and building permits that specifically allow additive construction methods.
What you CAN do:
- Hire a 3D printing construction company (ICON, Alquist, SQ4D operate in the US)
- Expect to pay $150-400 per square foot (competitive with conventional in many markets)
- Timeline: 4-12 weeks from permit to move-in
Regulatory status: Building codes in the US (IRC/IBC), Europe, and Dubai now have pathways for 3D printed structures, but approval still requires structural engineering sign-off on a project-by-project basis. It is not yet as simple as getting a standard building permit.
For more context on how this fits into the broader landscape of additive manufacturing, see our overview of 3D printing innovations.
How Much Do 3D Printed Architectural Models Cost?
One of the biggest advantages of 3D printing for architecture is cost reduction compared to traditional model-making. Here is a realistic breakdown:
Approach | Startup Cost | Per-Model Material Cost | Turnaround | Quality Level |
|---|---|---|---|---|
DIY with FDM printer | $200-500 (one-time) | $2-15 in filament | 4-24 hours print + 1-2 hours finishing | Good (concept to presentation) |
DIY with resin printer | $400-3,500 (one-time) | $10-40 in resin | 2-8 hours print + 1 hour finishing | Excellent (competition-ready) |
Online printing service | $0 (no printer needed) | $50-500 per model | 3-7 business days | Good to Excellent |
Traditional hand-built | $100+ in materials/tools | $50-500 in materials + labor | 1-4 weeks | Museum/exhibition quality |
Professional model-maker | $0 | $500-5,000+ per model | 2-6 weeks | Highest quality, custom |
The math for students: A $250 Bambu Lab A1 Mini plus a $20 spool of white PLA lets you produce approximately 30-50 architectural models before the filament runs out. Compare that to paying $50-200 per model at a printing service, and the printer pays for itself within 2-5 models.
The math for studios: A $3,500 Formlabs Form 4 eliminates the need to outsource presentation models. If your firm produces 10+ detailed models per year at $300-500 per outsourced model, the printer pays for itself within the first year.
FAQ
How do architects use 3D printing?
Architects use 3D printing primarily for physical scale models: concept models during early design to test spatial ideas, detailed presentation models for client meetings, competition models for submissions, and site models showing terrain and urban context. Some firms also use 3D printing to prototype building components at 1:1 scale (custom facade brackets, structural joints, furniture). At the industrial level, construction companies use building-scale 3D printers to fabricate actual walls and structural elements from concrete or clay for habitable buildings.
What 3D printers do architects use?
It depends on the firm size and model quality needed. Architecture students and small studios typically use FDM printers like the Bambu Lab A1 ($400) or Creality Ender 3 V3 ($200) for concept models. Professional firms that need presentation-quality results use the Formlabs Form 4 ($3,500), which is the most widely referenced 3d printer for architectural models in the industry. Large studios may also use SLS printers (Formlabs Fuse 1, $18,500) for complex geometries or binder jetting systems for full-color models. The choice depends on whether you prioritize speed and cost (FDM) or detail and surface finish (SLA/resin).
Is it legal to 3D print a house?
Yes, in an increasing number of jurisdictions. The United States, United Arab Emirates, Netherlands, Germany, and several other countries have approved 3D printed buildings under their existing or adapted building codes. However, you cannot simply buy a large printer and start extruding concrete in your backyard. Each project requires standard building permits, structural engineering certification, site inspections, and code compliance verification. The 3D printing aspect applies to the wall construction method; all other requirements (foundations, roofing, electrical, plumbing, fire safety) still follow conventional building regulations.
How much does it cost to 3D print an architectural model?
For DIY printing, material costs range from $2-15 for an FDM model (a spool of PLA produces many models) to $10-40 for a resin model. The main investment is the printer itself ($200-3,500 depending on technology). If you do not own a printer, online services like Shapeways or Craftcloud charge $50-500+ per model depending on size, material, and detail level. Compared to traditional hand-built models ($200-2,000+ including labor), 3D printing offers 5-10x cost savings for comparable results, especially when producing multiple iterations or revisions.
Can architecture students use FDM printers for school projects?
Absolutely. FDM printers in the $200-500 range produce models that are more than adequate for design studio critiques, concept presentations, and thesis projects. White PLA printed at 0.12mm layers gives a clean, professional appearance when sanded and primed. The key advantages for students are: very low per-model cost ($2-10), fast turnaround (print overnight, present in the morning), and the ability to iterate rapidly without spending hours hand-cutting new versions. For final thesis or portfolio models where maximum detail matters, consider pairing an FDM printer for large structural elements with an affordable resin printer for intricate detail pieces.



Comments ()