Electroplating 3D Prints: How to Plate PLA with Real Metal (Beginner Guide)
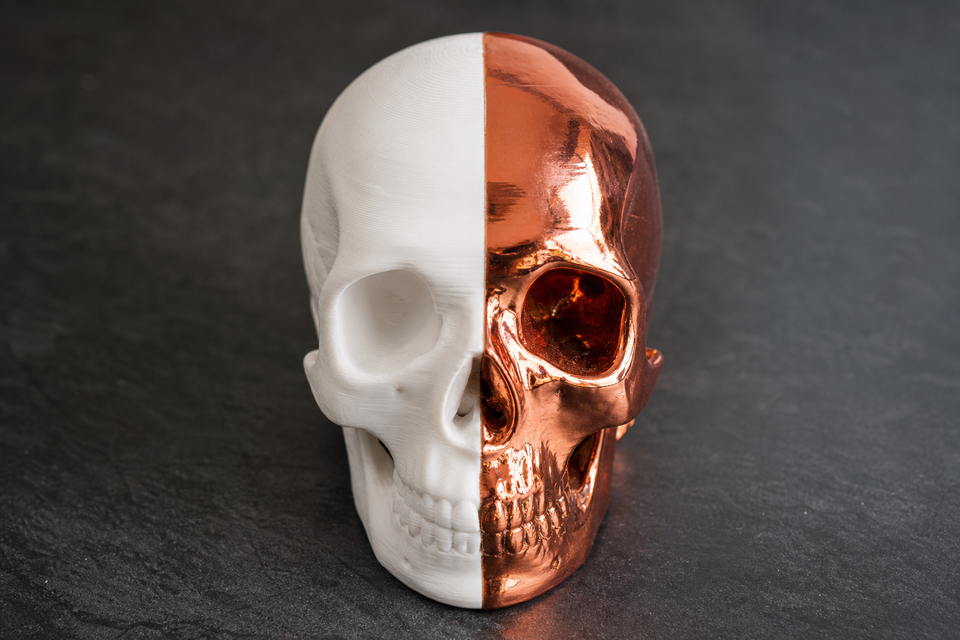
That shiny copper skull you saw on Reddit isn't spray paint. It's actual metal, deposited atom by atom onto a plastic 3D print through electroplating. The result looks, feels, and weighs like real metal because it is real metal, just on a plastic core.
Electroplating 3D prints sounds intimidating, but the basic process is surprisingly accessible. A starter copper plating setup costs under $50, fits on a desk, and produces results on your first attempt if you follow the steps carefully. This guide walks you through everything: materials, process, costs, different metals, and the mistakes that ruin your first few tries.
What Is Electroplating and How Does It Work on Plastic?
Electroplating is an electrochemical process that deposits a thin layer of metal onto a surface using electricity. In an industrial context, it's how car bumpers get their chrome finish and how jewelry gets its gold coating.
The basic science: you submerge your object (the cathode) in a solution containing dissolved metal ions. A piece of the same metal (the anode) sits on the other side. When you run DC current through the circuit, metal ions leave the anode, travel through the solution, and bond to the cathode. Layer by layer, a metal shell builds up on the surface.
The challenge with 3D prints: plastic doesn't conduct electricity. Metal ions won't deposit on a non-conductive surface. The solution is to first coat the print with a conductive material (graphite or silver paint) that turns the plastic into a conductor. Once the surface is conductive, electroplating works exactly the same as on any other metal object.
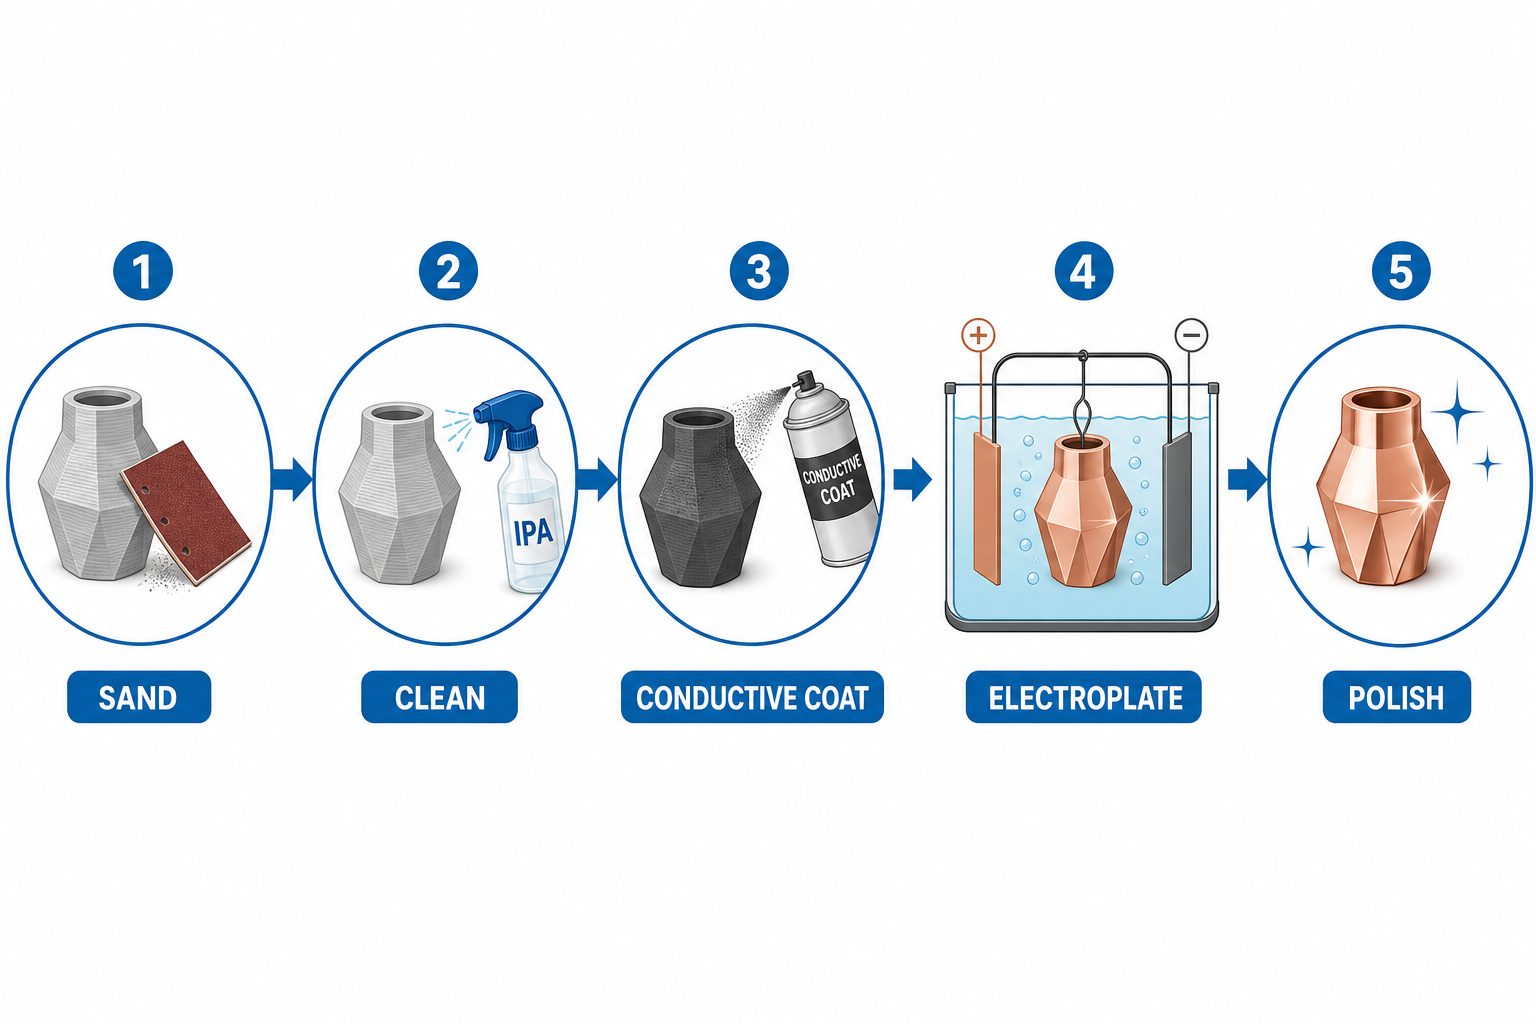
The entire workflow looks like this:
What You Need: Materials and Equipment
Basic Copper Plating Kit
Here's everything needed for a first copper electroplating setup:
Electrical:
- Adjustable DC power supply (3-12V, 0-2A) with voltage/current display
- Alligator clips and copper wire for connections
Chemicals:
- Copper sulfate (CuSO4) for the plating solution
- Distilled water
- Isopropyl alcohol (IPA) for cleaning
Consumables:
- Copper sheet or thick copper wire (anode)
- Conductive paint or spray (see below)
- Filler primer spray
- Sandpaper set: 120, 240, 400, 800, 1500 grit
Container:
- Glass or plastic container large enough to submerge your part (never metal)
Safety:
- Nitrile gloves
- Safety glasses
- Well-ventilated workspace or fume extraction
Conductive Paint for Electroplating 3D Prints
This is the critical bridge between plastic and metal. You have three main options:
Graphite/Carbon spray ($10-15): The budget option. Spray-on graphite creates a dark, conductive surface. It works well but has lower conductivity than silver, meaning plating takes slightly longer and may be less uniform in deep recesses. Some brands require an "activation" step (brief acid dip) before plating.
Silver conductive paint ($25-40): The premium option. Silver paint offers excellent conductivity with no activation required. Plating starts immediately and evenly. More expensive per can, but if you want reliable results on your first try, this is the safer choice.
DIY graphite powder + acrylic medium: The cheapest option. Mix fine graphite powder into clear acrylic medium and brush it on. Inconsistent but workable for simple geometries. Not recommended for detailed models.
Recommendation for beginners: Start with a graphite spray for your first project. It's forgiving and cheap enough that mistakes don't sting. Move to silver paint once you want professional-level results.
How to Electroplate 3D Prints: Step by Step
Step 1: Print and Sand Smooth
Electroplating doesn't hide imperfections. It amplifies them. Every layer line, every scratch, every bump on your print will be faithfully reproduced in shiny metal, making them more visible than they were in matte plastic.
Print your model at 0.12-0.16 mm layer height to minimize sanding work later.
Sanding progression:
- Start at 120 grit to knock down obvious layer lines
- Move to 240 grit for general smoothing
- 400 grit for a refined surface
- 800 grit for a near-glass finish
Between grit changes, spray a coat of filler primer. This fills micro-gaps between layers that sandpaper can't reach. Let it dry, then sand the primer smooth. Repeat until the surface feels completely uniform when you run your fingernail across it.
This step takes the most time (often 1-2 hours for a small part) but determines 90% of your final result.
Step 2: Clean Thoroughly
Any oil, dust, or residue will prevent the conductive coating from bonding properly, which then prevents metal from depositing in that spot.
- Wipe the entire surface with isopropyl alcohol
- Don't touch the cleaned surface with bare hands (oils from skin are enough to cause issues)
- Let it air dry completely, at least 10 minutes
Step 3: Apply the Conductive Coating
This is where your print transforms from insulator to conductor.
Application method:
- Spray (recommended): Hold 15-20 cm away, apply in thin, even passes
- Brush (backup): Use a soft brush, avoid thick globs
- Multiple thin coats are always better than one thick coat
Key points:
- Cover every surface that needs plating, including recesses and undercuts
- Let each coat dry fully before applying the next (follow product instructions, usually 15-30 minutes between coats)
- After final coat is dry, test with a multimeter set to continuity mode. Touch probes to different spots across the surface. You should get a beep everywhere.
If any area doesn't show continuity, add another coat there. A single non-conductive spot means that area won't plate.
Step 4: Set Up the Plating Bath
Solution preparation: Mix copper sulfate into distilled water at approximately 200g per liter. Stir until fully dissolved. The solution should be a clear, deep blue color.
Bath setup:
- Pour solution into your non-metal container
- Suspend the copper anode (plate or wire) in the solution, connected to the positive (+) terminal of your power supply
- Attach a copper wire to your 3D print using an alligator clip (this is your connection point, choose an inconspicuous spot)
- Connect the print's wire to the negative (-) terminal
- Submerge the print completely, ensuring no air bubbles are trapped on the surface
Important: The anode should be roughly the same surface area as your part, positioned parallel and at an even distance (5-10 cm works for small parts).
Step 5: Plate (Voltage, Current, and Time)
Turn on the power supply and set it low to start.
Starting parameters:
- Voltage: 3-5V
- Current: 0.1-0.3A (for a palm-sized object)
- You should see tiny bubbles forming on the part's surface immediately
Time guidelines:
- Decorative thin coat: 30-60 minutes
- Medium functional coat: 2-4 hours
- Thick structural coat: 8-24 hours
The golden rule: Low current + longer time = smoother, more even coating. High current plates faster but produces a rough, grainy, or "burnt" finish.
Check your part every 15-30 minutes during the first hour. Rotate it if one side is building up faster than the other. If you see dark spots or rough patches forming, reduce current immediately.
Step 6: Rinse, Inspect, and Polish
Remove the part from the bath and rinse thoroughly under running water.
The fresh copper coating will likely look dull, matte, or slightly rough. This is normal. The mirror finish you see in photos comes from post-plating polishing.
Polishing steps:
- Light sanding with 1500-2000 grit wet sandpaper
- Apply metal polishing compound with a soft cloth
- Buff until the surface shines
Optional protective finish: Raw copper oxidizes over time (turns darker/green). Apply a thin coat of clear lacquer or Renaissance Wax to preserve the shine.
Electroplating with Different Metals
Copper is the starter metal, but it's not the only option. Here's how different metals compare:
Metal | Difficulty | Appearance | Cost | Best For |
|---|---|---|---|---|
Copper | Beginner | Warm rose gold/penny | $ | First projects, warm aesthetic |
Nickel | Intermediate | Cool silver/chrome-like | $$ | Harder finish, corrosion resistance |
Chrome | Advanced | Mirror reflective | $$$ | Automotive/jewelry look (requires nickel base) |
Silver | Intermediate | Bright white silver | $$$ | Jewelry, electrical conductivity |
Gold | Advanced | Gold | $$$$ | Decorative (requires nickel + copper base) |
The layering approach: Professional electroplating rarely uses a single metal. A typical high-quality finish might be: Copper base coat (builds up quickly and cheaply) → Nickel middle coat (hard and corrosion resistant) → Chrome or gold top coat (decorative).
For beginners: master copper first. Once you consistently get smooth, even copper coats, nickel is a natural next step using the same basic equipment with different chemistry.
About "electroplating 3D prints with steel": True steel electroplating isn't practical at home. What most people mean is nickel plating, which gives a similar silvery, hard appearance. Iron plating exists but requires more complex chemistry and doesn't produce a stainless finish.
How Much Does Electroplating 3D Prints Cost?
DIY Home Setup
Item | Cost |
|---|---|
DC power supply (adjustable) | $15-30 |
Copper sulfate (500g) | $8-12 |
Conductive spray (graphite) | $10-15 |
Copper anode sheet | $5-10 |
Sandpaper set + primer | $10-15 |
Container + clips + wire | $5-10 |
Total starter kit | $50-90 |
After the initial setup, each additional part costs roughly $2-5 in consumed materials (solution degrades slowly, conductive paint gets used up).
Professional Plating Services
If you don't want to DIY:
- Single small part (custom): $50-200 depending on size and metal
- Batch production: $10-30 per piece at volume
- Multi-layer finish (copper + nickel + chrome): $100-300+ per piece
For one or two pieces, DIY wins on cost. For production runs where consistency matters, professional services deliver more reliable results.
Ready-Made Kits
Several companies sell complete electroplating kits targeted at 3D printing hobbyists. Search for "electroplating 3D prints kit" to find bundled options that include power supply, chemistry, conductive paint, and instructions in one box. These typically run $60-120 and remove the guesswork of sourcing individual components.
Design Tips: What Geometry Plates Best
Not every 3D printed shape electroplates equally well. Keep these principles in mind when designing parts intended for plating:
Flat, open surfaces plate most evenly. Current distributes uniformly across flat areas, giving you a consistent coating thickness.
Sharp edges and points plate thicker. Current concentrates at tips and edges (called the "dog bone effect"), building up excess metal there. If your design has sharp corners, expect them to be noticeably thicker than flat areas. You can round edges in your CAD file to reduce this.
Deep recesses and enclosed cavities plate poorly. Current struggles to reach inside deep holes or narrow channels. Solution can also stagnate in these areas. If your design has internal features, consider splitting the model so all surfaces are accessible.
Design for hanging. You need a connection point for the negative wire. Plan a small hole, hook, or tab that you can clip onto. Choose a spot that won't be visible in the final piece, or one you can trim off and polish later.
Best print technologies for electroplating: SLA/resin prints have naturally smooth surfaces, requiring less sanding. FDM works but needs significant prep. Regardless of technology, surface preparation is what determines your outcome.
How Strong Are Electroplated 3D Prints?
This depends entirely on coating thickness:
Decorative plating (under 0.05mm): Adds visual appeal and slight stiffness but doesn't meaningfully change structural strength. The part is still fundamentally plastic. However, even thin plating adds UV protection and prevents degradation from sunlight.
Functional plating (0.1-0.3mm): Noticeably stiffer and more durable. Copper or nickel at this thickness creates a rigid shell that resists denting and scratching. Think of it like a thin metal case around a plastic core.
Structural plating (0.3mm+): Significantly stronger. Testing shows that heavily copper-plated PLA parts can achieve 2-5x the strength of bare PLA in compression and bending tests. At this thickness, the metal shell carries most of the load.
Limitations:
- Metal coatings are rigid. If the underlying plastic flexes, the metal layer can crack or delaminate.
- Impact resistance doesn't improve as much as static strength. A plated part can still shatter if the PLA core breaks.
- Adhesion between metal and plastic is the weak point. Proper surface preparation and conductive coating application determine whether the metal stays bonded under stress.
Common Problems and How to Fix Them
Problem | What It Looks Like | Cause | Fix |
|---|---|---|---|
No plating in spots | Bare patches where metal won't deposit | Conductive coating missed those areas | Remove from bath, dry, apply more conductive paint, re-plate |
Rough/grainy surface | Feels like sandpaper, dull appearance | Current too high | Reduce voltage/current by 30-50%, plate slower |
Coating peels off | Metal flakes away when touched | Poor adhesion to conductive layer | Sand back to bare plastic, re-prep with better cleaning and even coating |
Uneven thickness | Edges thick, centers thin | Current density not uniform | Add auxiliary anodes near thin spots, rotate part during plating |
Dark or burnt patches | Black or very dark spots | Extreme current concentration | Reduce current, increase distance from anode, round sharp features |
Bubbles under coating | Bumps that pop when pressed | Air trapped during submersion or gas from bad chemistry | Agitate solution, ensure no trapped bubbles when submerging |
The #1 beginner mistake: Rushing the surface prep. If you spend 20 minutes sanding and jump to plating, you'll get a plated part that clearly shows every layer line in shiny metal. Spend the extra hour getting the surface smooth. Everything after that step is easy by comparison.
Safety Precautions
Electroplating involves chemicals and electricity. Neither is dangerous if handled properly, but both demand respect.
Chemical safety:
- Copper sulfate is toxic if ingested and irritating to skin/eyes. Always wear gloves and safety glasses.
- Nickel salts are a common skin sensitizer. Prolonged exposure can cause allergic reactions. Use extra caution with nickel chemistry.
- Never pour plating solutions down the drain. Collect spent solution in sealed containers and dispose through local hazardous waste programs.
Electrical safety:
- The voltages used (3-12V) are not dangerous to humans. You won't get shocked. However, short circuits can overheat wires and damage your power supply.
- Never leave an active plating bath unattended for extended periods.
Workspace:
- Work in a well-ventilated area. Electrolysis produces small amounts of gas at the electrodes.
- Keep food and drinks away from your plating station.
- Store chemicals in clearly labeled containers, away from children and pets.
FAQ
Can you electroplate a 3D print?
Yes. Any 3D printed part (PLA, ABS, PETG, resin) can be electroplated as long as you first apply a conductive coating to the surface. PLA is the easiest material to start with because it sands smoothly and holds conductive paint well. The process works on both FDM and resin prints.
How much does it cost to electroplate a 3D print?
A complete DIY copper plating setup costs $50-90 for the initial equipment and chemicals. After that, each additional part costs roughly $2-5 in consumed materials. Professional plating services charge $50-200+ per piece depending on size and metal type. Buying a ready-made electroplating kit runs $60-120.
How strong are electroplated 3D prints?
It depends on thickness. A thin decorative coat (under 0.05mm) adds minimal strength but protects against UV degradation. A functional coat (0.1-0.3mm) adds noticeable rigidity and scratch resistance. Heavy structural plating (0.3mm+) can increase compression and bending strength by 2-5x compared to bare plastic, creating a true metal shell around the plastic core.
What is the best metal to start with for electroplating 3D prints?
Copper. It's the cheapest chemistry, the most forgiving of beginner mistakes, plates quickly and evenly, and the warm copper finish looks great on its own. Once you're comfortable with copper, nickel is the natural next step for a harder, more corrosion-resistant silver finish.

Comments ()