What Is a STEP File? Format, Viewers, and How to Use It for 3D Printing
You downloaded a cool model from MakerWorld or Printables, but instead of the usual .stl, you got a .step file. Your slicer won't open it. Now what?
Don't worry. A STEP file is actually a better starting point than an STL in many situations. It gives you more control, more detail, and more flexibility. You just need to know what to do with it. This guide walks you through what the STEP file format is, how to open it, how to convert it for printing, and why it might actually give you better print quality.
What Is a STEP File?
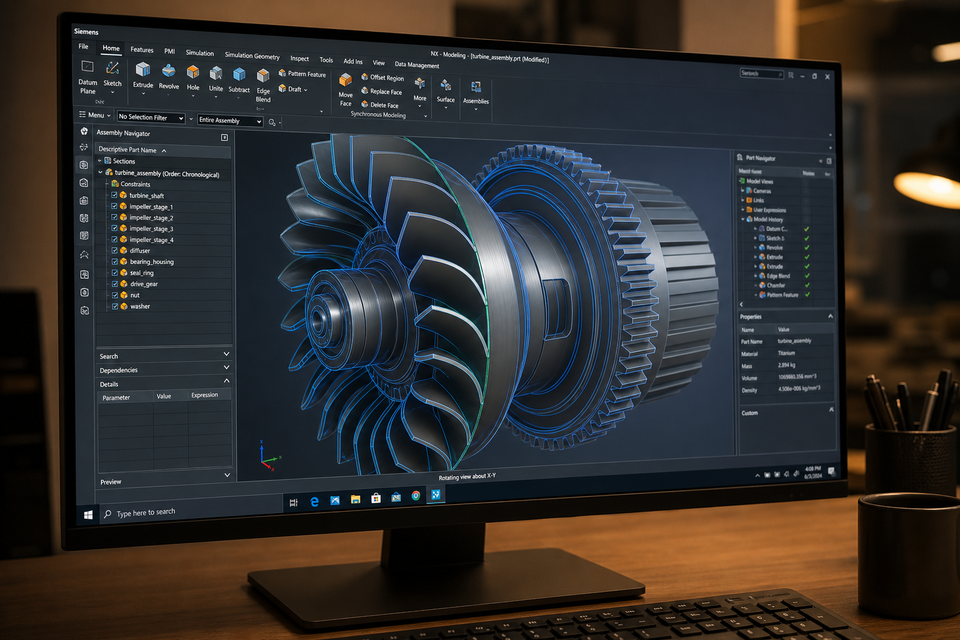
A STEP file is a standard CAD (Computer-Aided Design) file format used to share 3D models between different software. STEP stands for Standard for the Exchange of Product Data, and it's defined by the international standard ISO 10303.
Think of it this way: if an STL file is like a JPEG (a simplified, flattened version of something), then a STEP file is like the original Photoshop file. It keeps all the precise geometry, layer information, and editing capability intact.
A STEP file stores:
- Exact mathematical surfaces (curves stay perfectly smooth at any zoom level)
- Assembly relationships (which parts connect where)
- Color and material data (not just shape)
- Full editing capability (you can change dimensions, add holes, move parts)
File extensions are .step or .stp. They're the same format, just named differently.
Almost every professional CAD program in the world can read and write STEP files. That's the whole point of the format: it's the universal translator for 3D engineering data.
STEP File Format: How It Stores 3D Data
The STEP file format uses a representation called B-Rep (Boundary Representation). Instead of approximating a sphere with hundreds of tiny triangles (like STL does), a STEP file describes that sphere with a single mathematical equation. The curve is always perfect, no matter how far you zoom in.
Under the hood, a STEP file is actually plain text. You could open it in Notepad and see lines like #52 = CIRCLE('', #53, 12.5); describing geometry. Not human-readable in any useful way, but the point is that it's not encrypted or proprietary.
What makes this format powerful for 3D printing:
- Models stay accurate when scaled (no loss of detail)
- Curved parts print smoother because the source data is mathematically exact
- Multi-part assemblies stay organized (each component is separate but positioned correctly)
- File sizes are often smaller than high-resolution STLs for complex curved parts
STEP vs STL: What's the Difference?
This is the most common question beginners ask when they first encounter a STEP file. Here's the comparison:
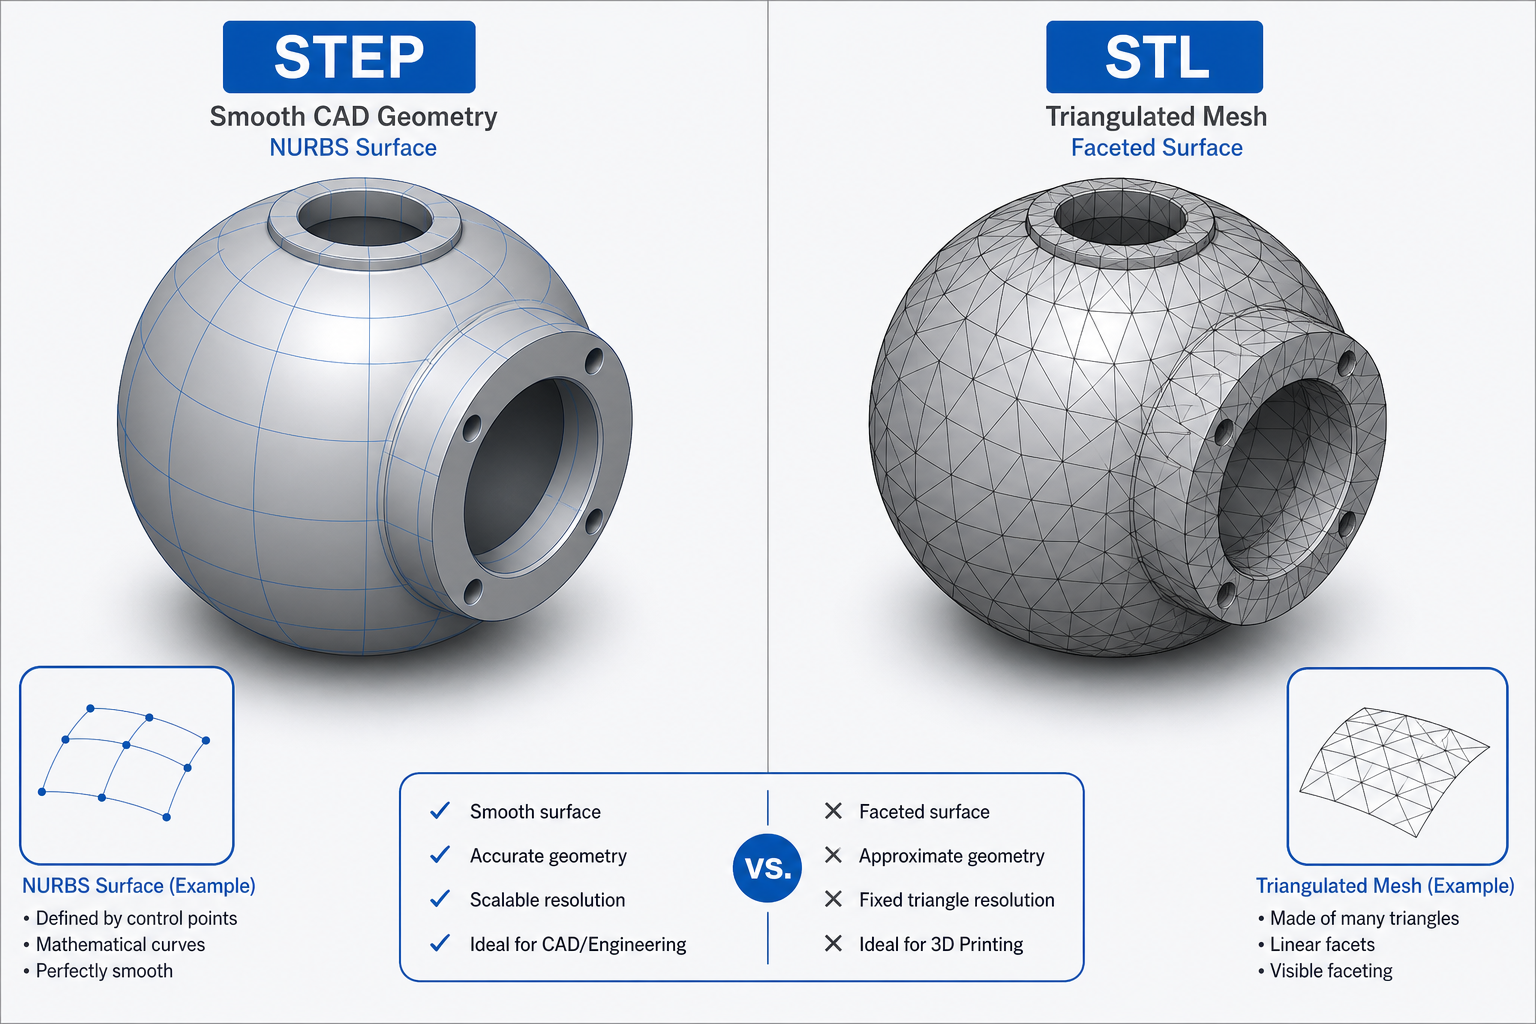
Left: STEP geometry with smooth NURBS surfaces. Right: STL with visible triangular mesh facets on the same curved shape
Feature | STEP File | STL File |
|---|---|---|
Geometry type | Exact mathematical curves (B-Rep) | Triangle mesh approximation |
Editable in CAD? | Yes, fully parametric | Very difficult to modify |
Surface smoothness | Always perfect | Depends on triangle count |
Multi-part assemblies | Supported | One solid blob per file |
Color/material info | Included | Not supported |
File size (complex part) | Often smaller | Can be very large at high resolution |
Slicer compatible? | Bambu Studio only (direct) | All slicers |
Best for | Design, modification, sharing source | Slicing and printing |
The practical difference for you: If you just want to print a model as-is, an STL or 3MF file works fine. But if you want to modify something (resize a mounting hole, remove a feature, combine parts), having the STEP file saves you hours of frustration. Editing a mesh in STL is like trying to reshape a mosaic tile by tile. Editing a STEP file is like adjusting a slider.
What Is a STEP File Used for in 3D Printing?
As a 3D printing beginner, here's when you'll encounter STEP files and why they matter:
Remixing and customization. A designer shares their STEP file so you can adapt the model. Need to change a phone case to fit a different phone? Adjust a bracket to mount at a different angle? With the STEP file, these changes take minutes in Fusion 360 or FreeCAD.
Better print quality on curves. When a slicer works from STEP data (as Bambu Studio does), it can generate smoother toolpaths on curved surfaces. More on this below.
Multi-part assembly organization. A complex model with 20 pieces stays organized. You can see how parts fit together, color them independently, and print them in the right order.
Where you'll find them: Some designers on MakerWorld, Printables, and Thangs include the STEP file alongside the STL. Paid model marketplaces often provide STEP as the "source file" for customers who want to modify the design.
How to Open STEP Files
Bambu Studio: Import STEP Directly for Slicing
If you have a Bambu Lab printer, Bambu Studio is the easiest way to work with STEP files. Just drag the .step file directly into Bambu Studio. No conversion step needed.
What makes this special:
Assembly View. When you import a multi-part STEP file, Bambu Studio automatically creates an Assembly View showing how all the parts fit together in their original positions. You can switch between Assembly View (to see the big picture and assign colors) and the standard plate view (for arranging parts for printing). This is a huge time-saver for complex models.
Arc Move (G2/G3) advantage. Because STEP files preserve exact curve data, Bambu Studio converts them internally at very high precision (higher than a typical STL export). This means the slicer can generate more G2/G3 arc movement commands instead of dense straight-line segments. The result: smoother surfaces, less vibration, and quieter printing at high speeds.
Adjustable import quality. When you import a STEP file, Bambu Studio shows a dialog with two parameters:
- Linear Deflection: Controls the maximum distance between the original curve and the mesh approximation
- Angular Deflection: Controls how finely curved faces are divided
Smaller values = higher quality but slower import and slicing. The defaults work well for most prints.
Free STEP File Viewers (View Only)
If you just want to look at a STEP file without editing or printing:
- CAD Assistant (Open Cascade) — Free desktop app, lightweight, good for quick viewing
- 3D Viewer Online (browser) — No install needed, drag and drop at 3dvieweronline.com
- eDrawings Viewer (Dassault) — Free viewer with measurement tools
Free CAD Software That Opens STEP Files (View + Edit)
- Fusion 360 (free for personal use) — Full parametric editing, the most beginner-friendly option
- FreeCAD — Open source, no account needed, runs on Windows/Mac/Linux
- OnShape (free tier) — Runs entirely in the browser, no download required
Other Software That Supports STEP Files
SolidWorks, Inventor, CATIA, Creo, AutoCAD, Blender (with add-on), SketchUp (with extension). These are mostly paid professional tools, but worth mentioning if you already have access.
How to Convert STEP to STL for 3D Printing
If your slicer doesn't support STEP directly (Cura, PrusaSlicer, Creality Print, etc.), you'll need to convert to STL first.
Option 1: Skip the Conversion (Bambu Studio Users)
Bambu Lab users can skip this section entirely. Drag the STEP file into Bambu Studio, slice, and print. If you need an STL copy for someone else, go to File > Export > Export plate as STL.
Option 2: Convert in Fusion 360
- Open Fusion 360, go to File > Open, select your .step file
- The model appears in the workspace (you can edit it here if needed)
- Go to File > Export
- Set Format to STL
- Choose "High" refinement for smooth curves
- Save and import the STL into your slicer
Option 3: Convert in FreeCAD
- Open FreeCAD, go to File > Import, select your .step file
- Select the imported part in the model tree
- Go to File > Export
- Choose .stl as the file type
- Set mesh deviation (0.1 mm works for most prints)
- Save
Option 4: Convert Online (No Software Install)
Several websites handle this if you don't want to install anything:
- makexyz.com/convert
- imagetoSTL.com
- AnyConv.com
Upload the STEP file, download the STL. Simple, but you get no control over mesh quality and can't edit the model first.
Tip: When converting, set mesh quality to "High" or "Fine." A low-quality conversion defeats the purpose of having a STEP file in the first place.
Where to Download STEP Files
Not all model sites offer STEP files, but these do:
- MakerWorld — Bambu Lab's model platform. Some designers include STEP source files alongside print-ready 3MF/STL
- Printables — Filter by file type or check individual model pages for .step attachments
- Thangs — Search with file type filters, decent STEP library
- GrabCAD — Large library of engineering/mechanical STEP files (gears, enclosures, brackets)
- TraceParts / 3D ContentCentral — Standard components (screws, bearings, connectors) from manufacturers
Search tip: If a model page only shows STL, check the comments or message the designer. Many will share the STEP file if you ask nicely.
When You Don't Need a STEP File
A STEP file isn't always better. Here's when STL is the simpler choice:
- You just want to print and move on. No modifications needed? STL is ready to slice immediately in any slicer.
- The model is organic/sculpted. Characters, figurines, and artistic models are usually created in mesh-based sculpting tools (ZBrush, Blender). A STEP file wouldn't exist for these.
- You're batch printing. For production runs with no changes needed, STL/3MF is more efficient to manage.
- File compatibility matters. If you're sharing with someone who uses Cura or PrusaSlicer, send them an STL. Not everyone can handle STEP files directly.
The simple rule: download the STEP file if available (it's free insurance for future modifications), but use the STL for day-to-day printing unless you're on Bambu Studio.
The Full Workflow for Bambu Lab Users
Here's the ideal workflow when you find a STEP file on MakerWorld or elsewhere:
- Download the .step file from MakerWorld
- Drag it into Bambu Studio
- Use Assembly View to understand how parts fit together
- Split into objects if needed, assign colors via AMS
- Slice (benefits from arc movement for smoother curves)
- Send to printer
- Monitor via Bambu Handy on your phone
For non-Bambu users: Download STEP > Open in Fusion 360 or FreeCAD > Modify if needed > Export as STL > Import into your slicer > Slice and print.
FAQ
What program opens a .STEP file?
Free options include Fusion 360 (personal license), FreeCAD, OnShape (browser-based), and CAD Assistant (view only). Bambu Studio can also import STEP files directly for slicing. Paid options include SolidWorks, Inventor, and CATIA.
What is a STEP file used for?
A STEP file stores precise 3D CAD geometry in a universal format that works across different software. In 3D printing, it's used when you want to modify a model before printing, maintain maximum surface accuracy on curved parts, or work with multi-part assemblies.
What is the difference between STL and STEP files?
STL files approximate shapes using triangles (mesh). STEP files store exact mathematical geometry (curves, surfaces). STL is directly compatible with all slicers but hard to edit. STEP files are fully editable in CAD software but need conversion for most slicers (except Bambu Studio, which imports them directly).
Is a STEP file a CAD file?
Yes. STEP (ISO 10303) is one of the most widely used CAD exchange formats in the world. It's specifically designed to transfer 3D model data between different CAD programs without losing information. Nearly every engineering CAD tool can read and write STEP files.


Comments ()